














Direct answer
If Google Play says your app is not available to a tester, first identify whether the failure happens when joining the test or when installing the app. Check the intended account and access setup, then the relevant release, country and device conditions. A link that opens is only one step in confirming that testing works.
Start with the table below. Pick the failure you can see, and it names the check to run next.
This guide covers a closed test that intended testers cannot join or install. A test that runs but whose requirement card does not move is a different problem with a short route of its own near the end. Play Console wording varies with the state of your app, so follow the label you see rather than expecting an exact match with this text.
What this guide covers
Start Here: Where Does Access Fail?
Not available covers several different failures. Use what the tester actually sees, and how many testers are affected, to choose the next check. These rows are diagnostic clues, not conclusive causes: one tester succeeding does not prove that every intended tester has access, and one error string does not identify one cause.
Pick what you observe
| Observed failure | Check next |
|---|---|
| The invitation page does not open, or it rejects the account | Confirm the invited account and completed opt-in, then the intended release on the intended track. |
| Enrollment completes, but installation fails | Follow the device and build branch, then confirm the country availability for that tester's Play country. |
| One tester fails while another succeeds | Compare the two testers' evidence: account, list inclusion and opt-in, Play country, and device. The shared configuration is already working for one of them. |
| Every intended tester fails | Inspect the shared configuration first: track, selected list, link, countries and publishing state. Then verify with one eligible tester before inviting the rest again. |
| The app installs, but the requirement card is the concern | If the intended closed-test build is accessible to the enrolled tester, access is not the problem. Follow the short progress route to the dedicated guide instead of changing access settings. |
Video: the Play Console checks, on screen
Recorded in May 2026 for the previous version of this guide. About five minutes.
Where the video and this text differ, follow the text
Three points in the recording are superseded: Google describes processing as a few hours to seven days, not 20 to 30 minutes; test countries are synced with production by default, so check the sync setting before editing; and opening the link while logged out does not test tester access. Use the tester procedure for that.
Check the Tester's Account and Enrollment
Correct Console settings still leave a tester blocked if the wrong Google account is in use, or if the tester was added to a list but never completed the joining step. Being included and having joined are two different states. Give each tester this procedure, in this order, and ask for the stage that fails.
- Confirm the invited Google account. The address in the selected email list, or the account that is a member of the configured Google Group, is the only one Google Play recognises for this test. Ask the tester which account the device and browser are signed in with.
- Verify inclusion before opting in. For an email list, the address must be in the list that is selected on the track. For a Google Group, the tester must already be a member of the group, not only invited to it.
- Use that same account in the opt-in browser and in the Play Store. A browser signed in to a different account, or a phone whose Play Store uses a second account, can cause an access or eligibility error even when everything else is right.
- Complete the opt-in, then follow the installation link. The opt-in page shows a confirmation once the tester has joined. Only after that does the Play Store listing offer the test build.
- Confirm the result on the intended device. Ask for the exact stage reached: joined, installed, or opened. If it failed, ask for the exact message on screen and a screenshot.
Source: Set up an open, closed, or internal test (Play Console Help).
The internal-test exception
A tester who opted in to your internal test is not eligible for the closed or open test until they opt out of the internal test and then opt in to the intended one. For this internal-to-closed transition, the tester must leave the internal test first. Leaving and rejoining is not a general remedy: do not ask a working tester to do it.
If the test uses a Google Group
The group address is what you add on the track. A tester who was only invited to the group is not yet a member; the invitation has to be accepted, and membership is visible in Google Groups, not in Play Console. Once membership is confirmed, the tester opts in through the same link with the same account. Group membership on its own enrols nobody.
Message to send a tester
If copying is blocked, select the text above and copy it. Sending it does not confirm that installation succeeded.
For the full invitation flow, including email lists versus groups and how to read the invited and opted-in counts, see how to invite testers and confirm opt-in.
Five Play Console Setup Checks
In the support cases PrimeTestLab handles, these five settings are the ones most often found wrong on the developer side. That is our observed case mix, not a Google rule and not an exhaustive list: the tester checks above and the device branch below cover failures these settings cannot explain. Work through them on the track your testers are supposed to join.
Confirm the release and tester configuration are on the intended track
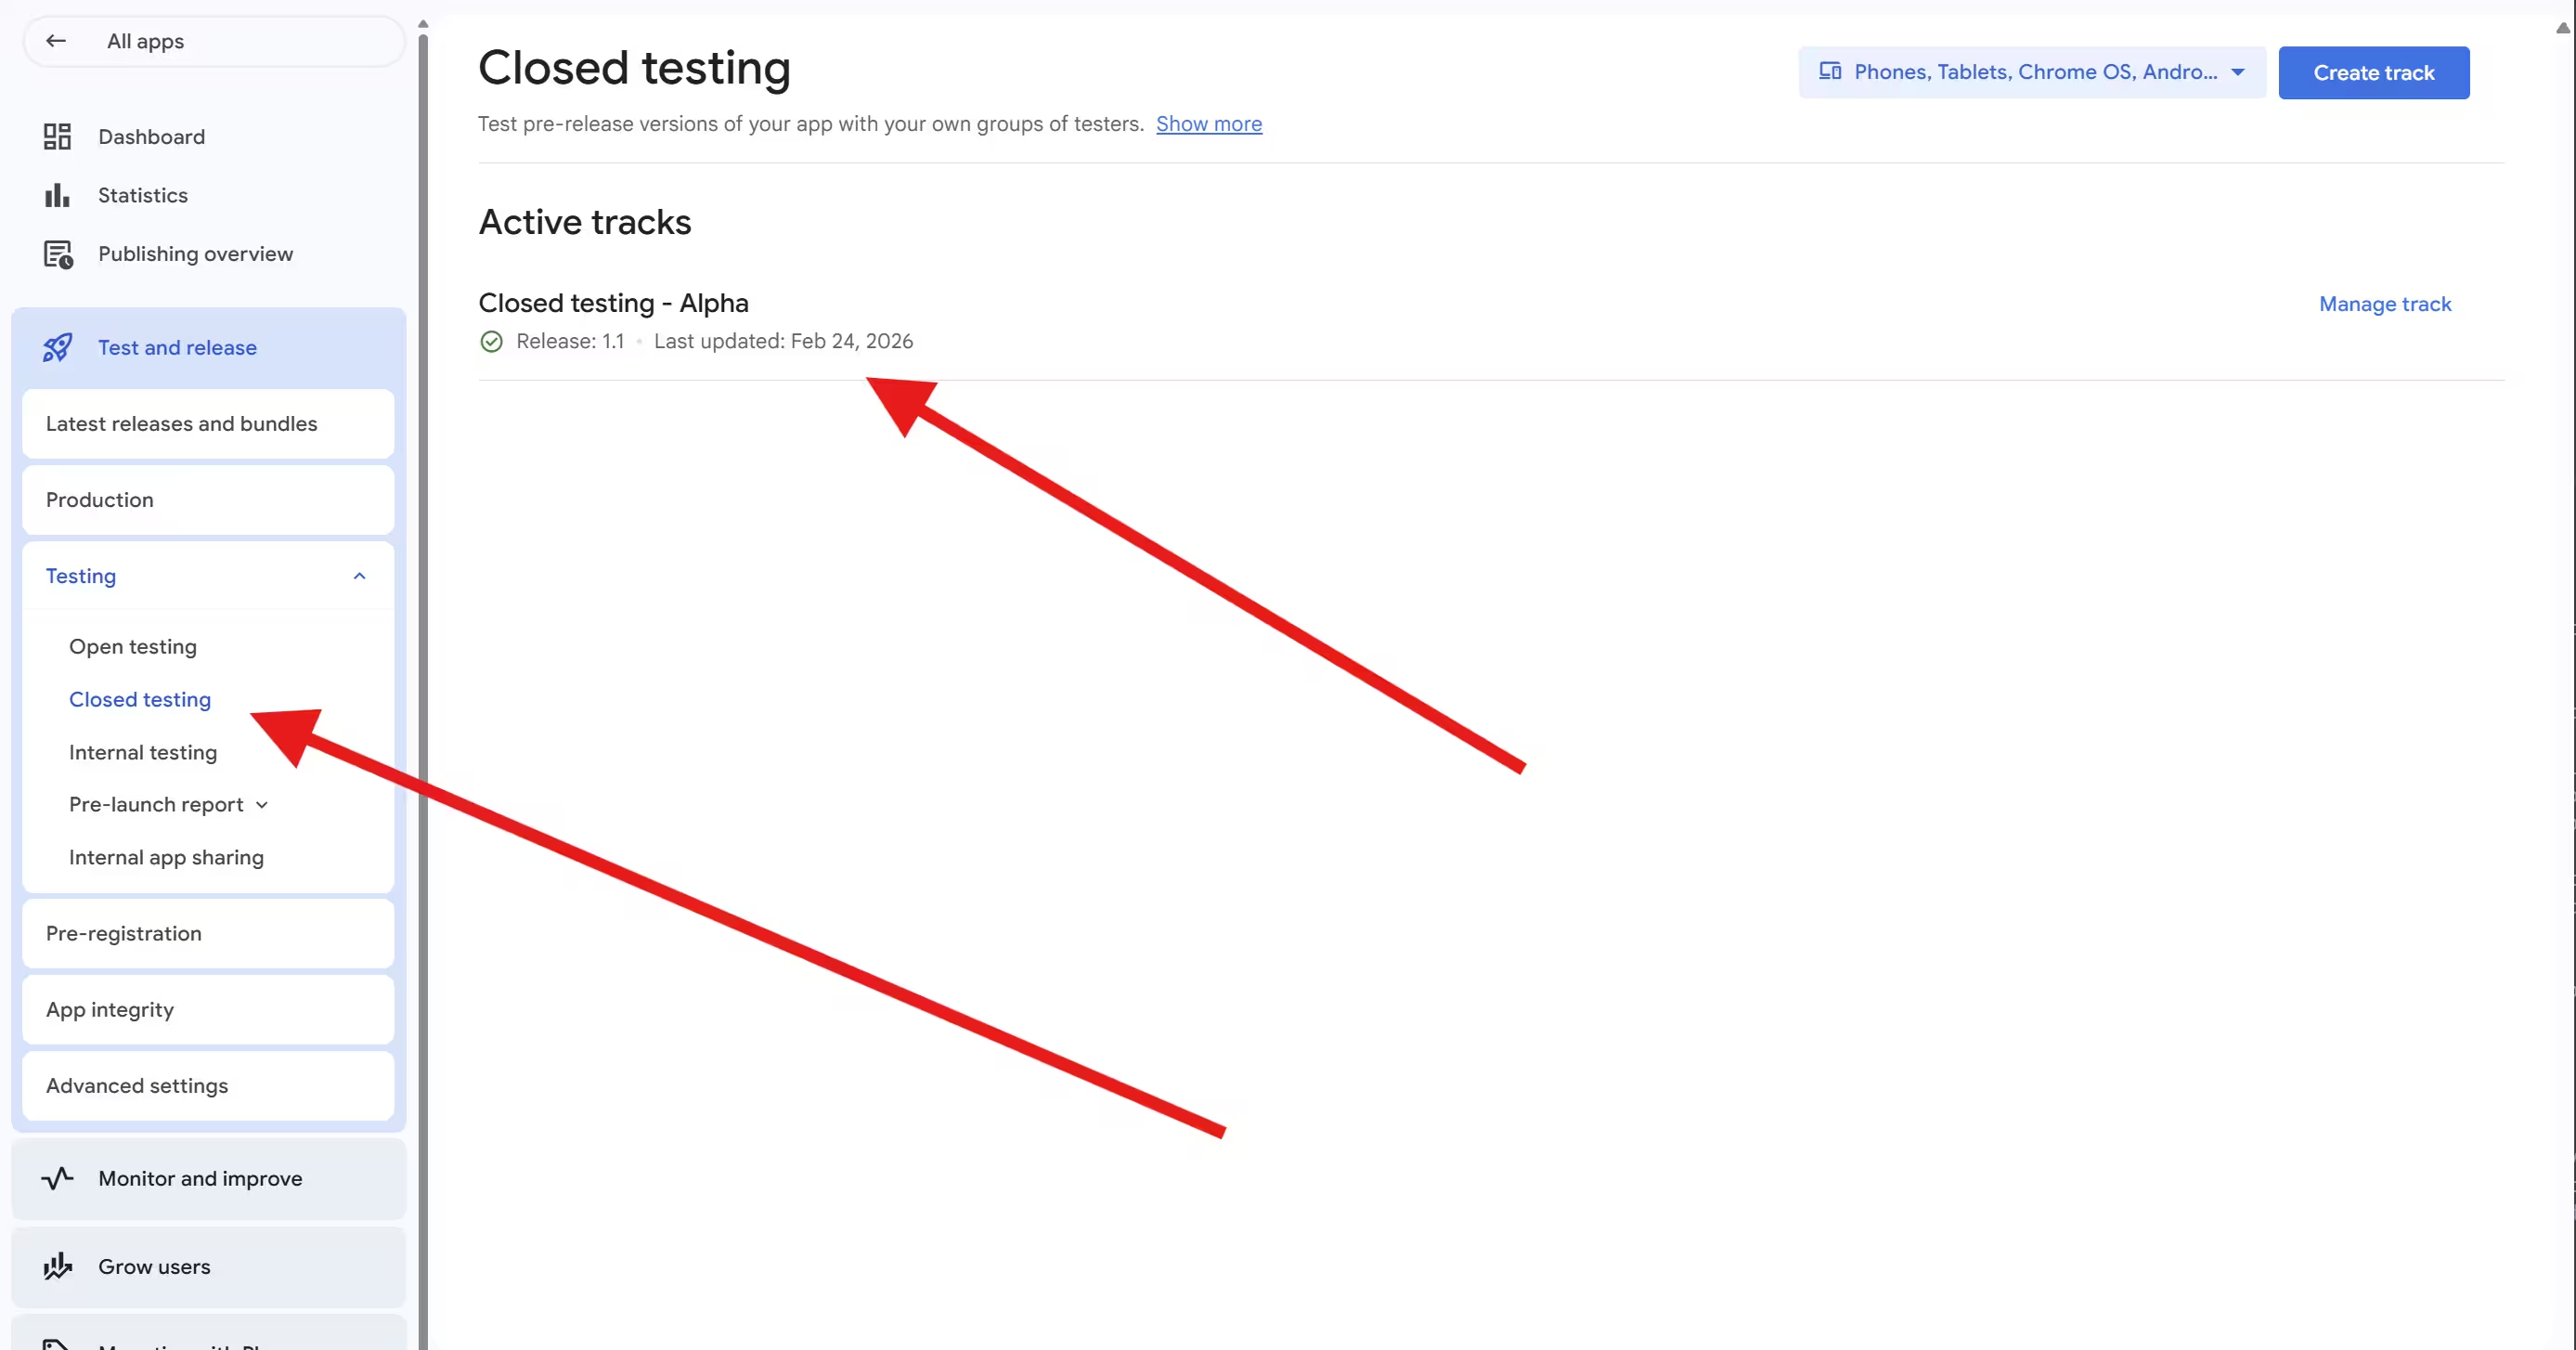
Play Console lets you run several closed testing tracks. Each has its own releases and its own tester configuration. If the release you expect testers to install is on Track A and the selected list is attached to Track B, the two never meet: the testers configured on Track B are eligible for a track with no available release, and nobody you meant to reach is configured as eligible on Track A.
 Click to enlarge
- Open Testing > Closed testing in Play Console.
- Find the track whose link you shared and open Manage track.
- On the releases view, confirm the intended release, not merely any release, shows as available to testers with the version you expect.
- On the Testers tab of that same track, confirm the intended list or group is selected.
Mismatch
Release available on Track A, list selected on Track B. The testers configured as eligible on Track B have no available release to receive; nobody is configured as eligible on Track A, where the release is.
Aligned
Intended release available on Track A, intended list selected on Track A, invitation copied from Track A.
If the release is still a draft
A draft is not being served to anyone. Open it, complete what Console asks for, and continue through the release workflow until the release is available on the track. The button wording depends on the state, and a release that needs review waits for that review before it becomes available. Another eligible release on the same track, such as an older version, may still be served while the new one is unfinished, so testers may see a different version rather than nothing.
Source: Prepare and roll out a release (Play Console Help).
Keep it simple
If you only need one closed test, use one track. Several tracks are useful for staged cohorts and are a frequent source of a release and a list that never meet.
Select and save the intended tester list
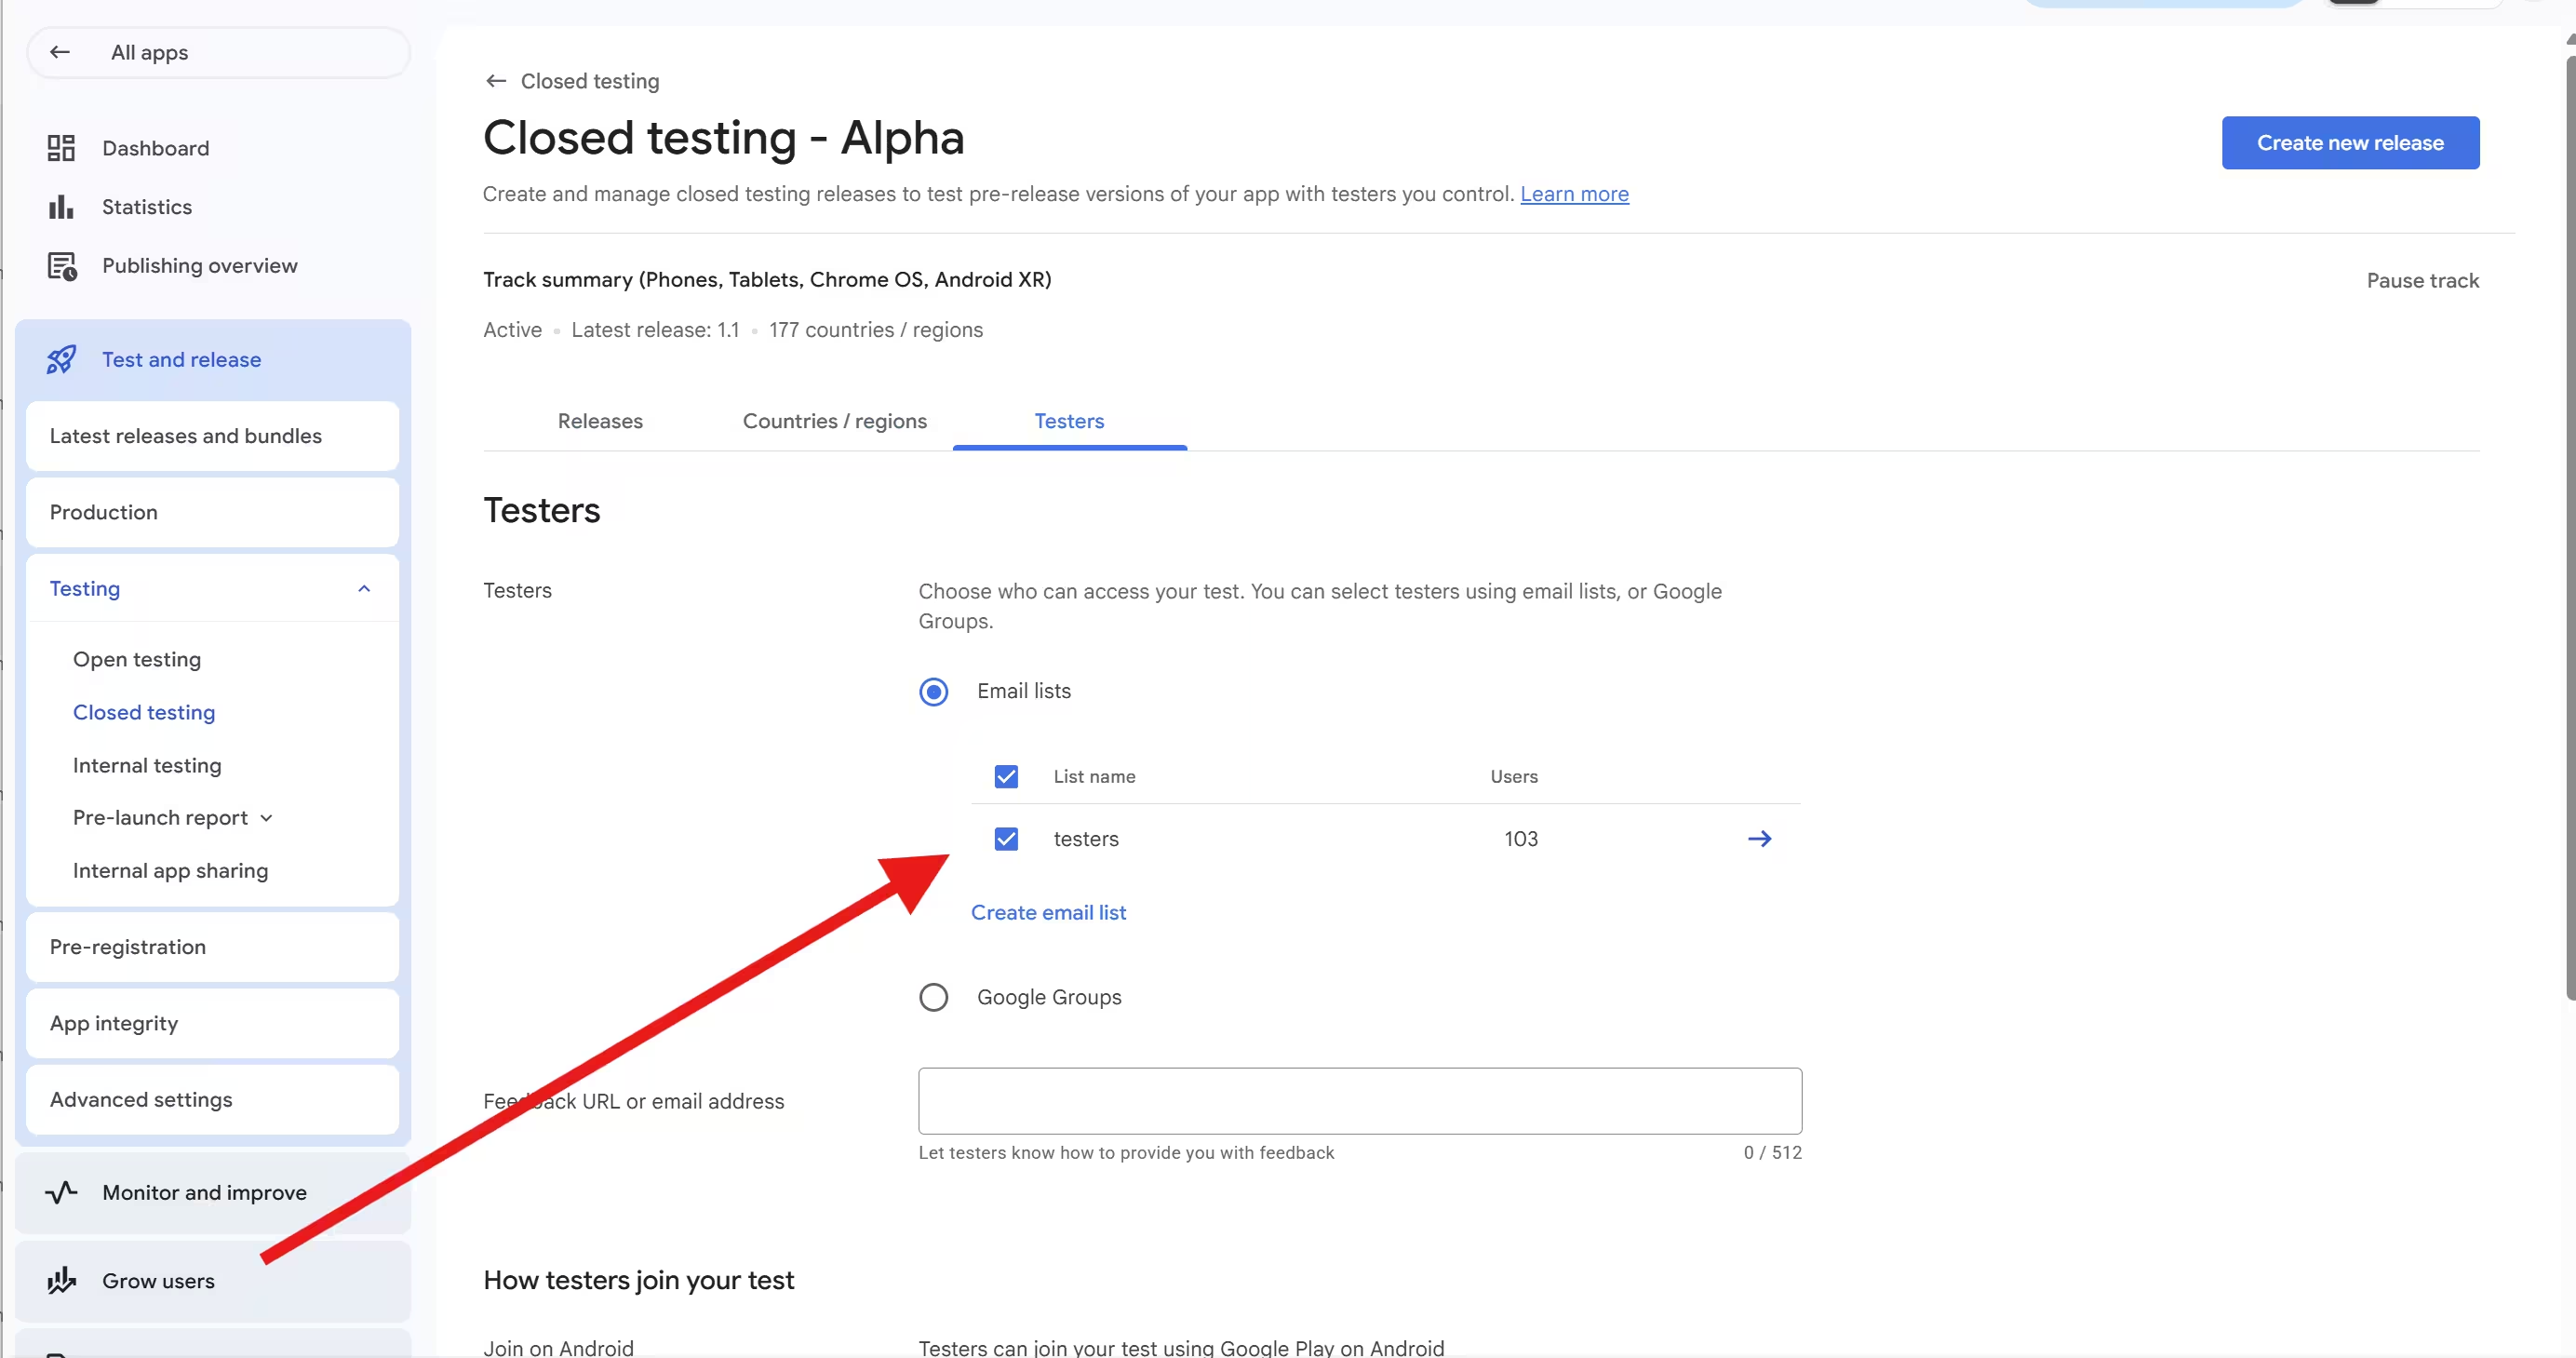
Creating an email list and selecting it for a track are two separate operations. A list can exist in your account, hold every address you meant to add, and still not apply to the track until its checkbox is ticked and the change is saved.
 Click to enlarge
Upload or create the list
On the Testers tab, create an email list, give it a name, and add the addresses or upload a CSV. Save it.
Tick the checkbox next to the intended list
The list appears in the table whether or not it is selected. It applies to this track only when its checkbox is ticked.
Save the change
Save at the bottom of the page. The list now shows as selected for this track. If Console reports the change as waiting for review, submit it from Publishing overview.
Why Saving a List Does Not Select It
Email lists are account-level objects that can be reused across tracks, so Console keeps creating a list separate from applying it to a track. That is intentional configuration behaviour, not a bug. A saved list still needs to be selected for the track, which is why the step is easy to miss.
Membership changes versus selecting a list
Selecting a list for a track is a configuration change and may need to go through review before it applies. Adding or removing addresses inside a list that is already selected is treated differently: Google lists membership changes among the exceptions that are not held back by managed publishing. If the list is selected and a specific tester still cannot join, return to the tester checks rather than re-saving the list.
Sources: Set up a test and Control when app changes are reviewed and published (Play Console Help).
Copy the intended invitation and distinguish it from the install link
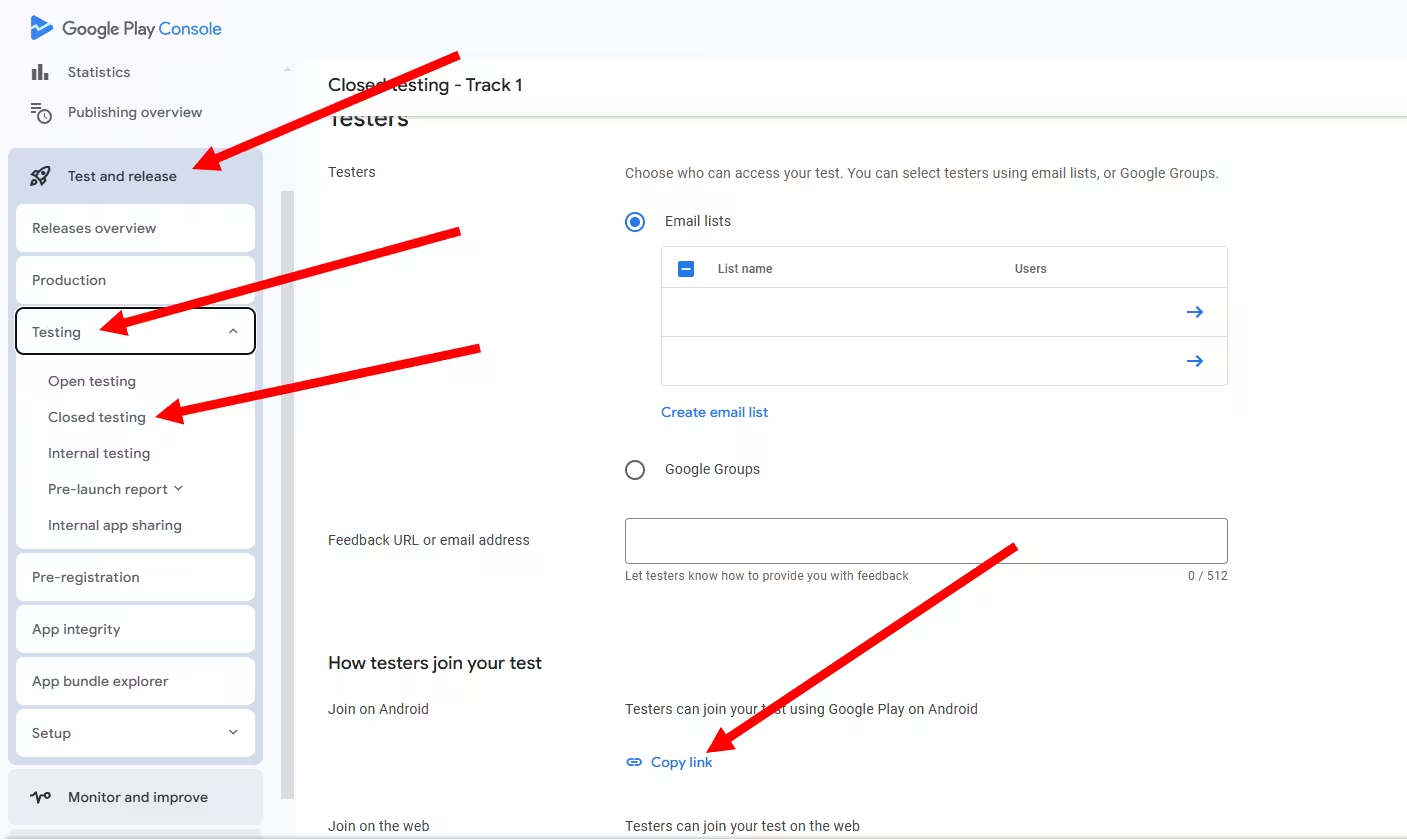
Copy the shareable invitation from the Testers tab of the intended track, and confirm the configured tester access and available release in Console instead of relying on the URL to identify the track. Sharing the internal test's invitation with your closed testers sends them to a test they are not configured for. There are also two different destinations: the invitation link, where a tester joins, and the Play Store listing, where a tester installs after joining. A store link on its own enrols nobody.
 Click to enlarge
The three tracks and the closed testing requirement
| Where copied from | Track | Counts toward the closed testing requirement? |
|---|---|---|
| Testing > Internal testing | Internal (up to 100 testers per app) | No |
| Testing > Closed testing | Closed (the track the requirement is about) | Yes |
| Testing > Open testing | Open (public test) | No affected accounts gain open testing after production access |
The requirement applies to personal developer accounts created after November 13, 2023. Internal testing has no organisation or employment condition; the limit is the count per app. For the wider comparison, see internal, closed and open testing differences.
Recognize the Link Format, Then Verify the Intended Test
- Invitation (opt-in) link:
play.google.com/apps/testing/<package name>. Testers use it to join. Public tests use the same path pattern, so the format alone does not prove a closed track: confirm the test in Play Console. - Internal test link:
play.google.com/apps/internaltest/.... Wrong for a closed test. - Play Store listing:
play.google.com/store/apps/details?id=<package name>. The install destination after joining. It does not enrol anyone.
Sources: Set up a test, App testing requirements for new personal developer accounts, and Google's own public Chrome Beta for Android test, which uses the same path pattern.
Check Your Google Play Link Format
Paste a link to see which Google Play URL pattern it matches. Format only: this does not verify the app, the track or tester access.
Testers who used your internal test
A tester enrolled in your internal test must opt out of it before this invitation works for them. See the internal-test exception above.
Check country availability and synchronization
Check the Play country registered on each intended tester's account. Test countries match production by default. If this test needs different availability, inspect the sync setting and use Unsync countries/regions before editing the test's countries. Select the coverage your test requires; a larger country list does not remove other access conditions.
Google targets by the account's Play country, meaning where the account is registered, not where the tester is right now. Travel does not by itself change the account's Play-country targeting. A tester whose account is registered elsewhere is not covered by adding the country they currently live in.
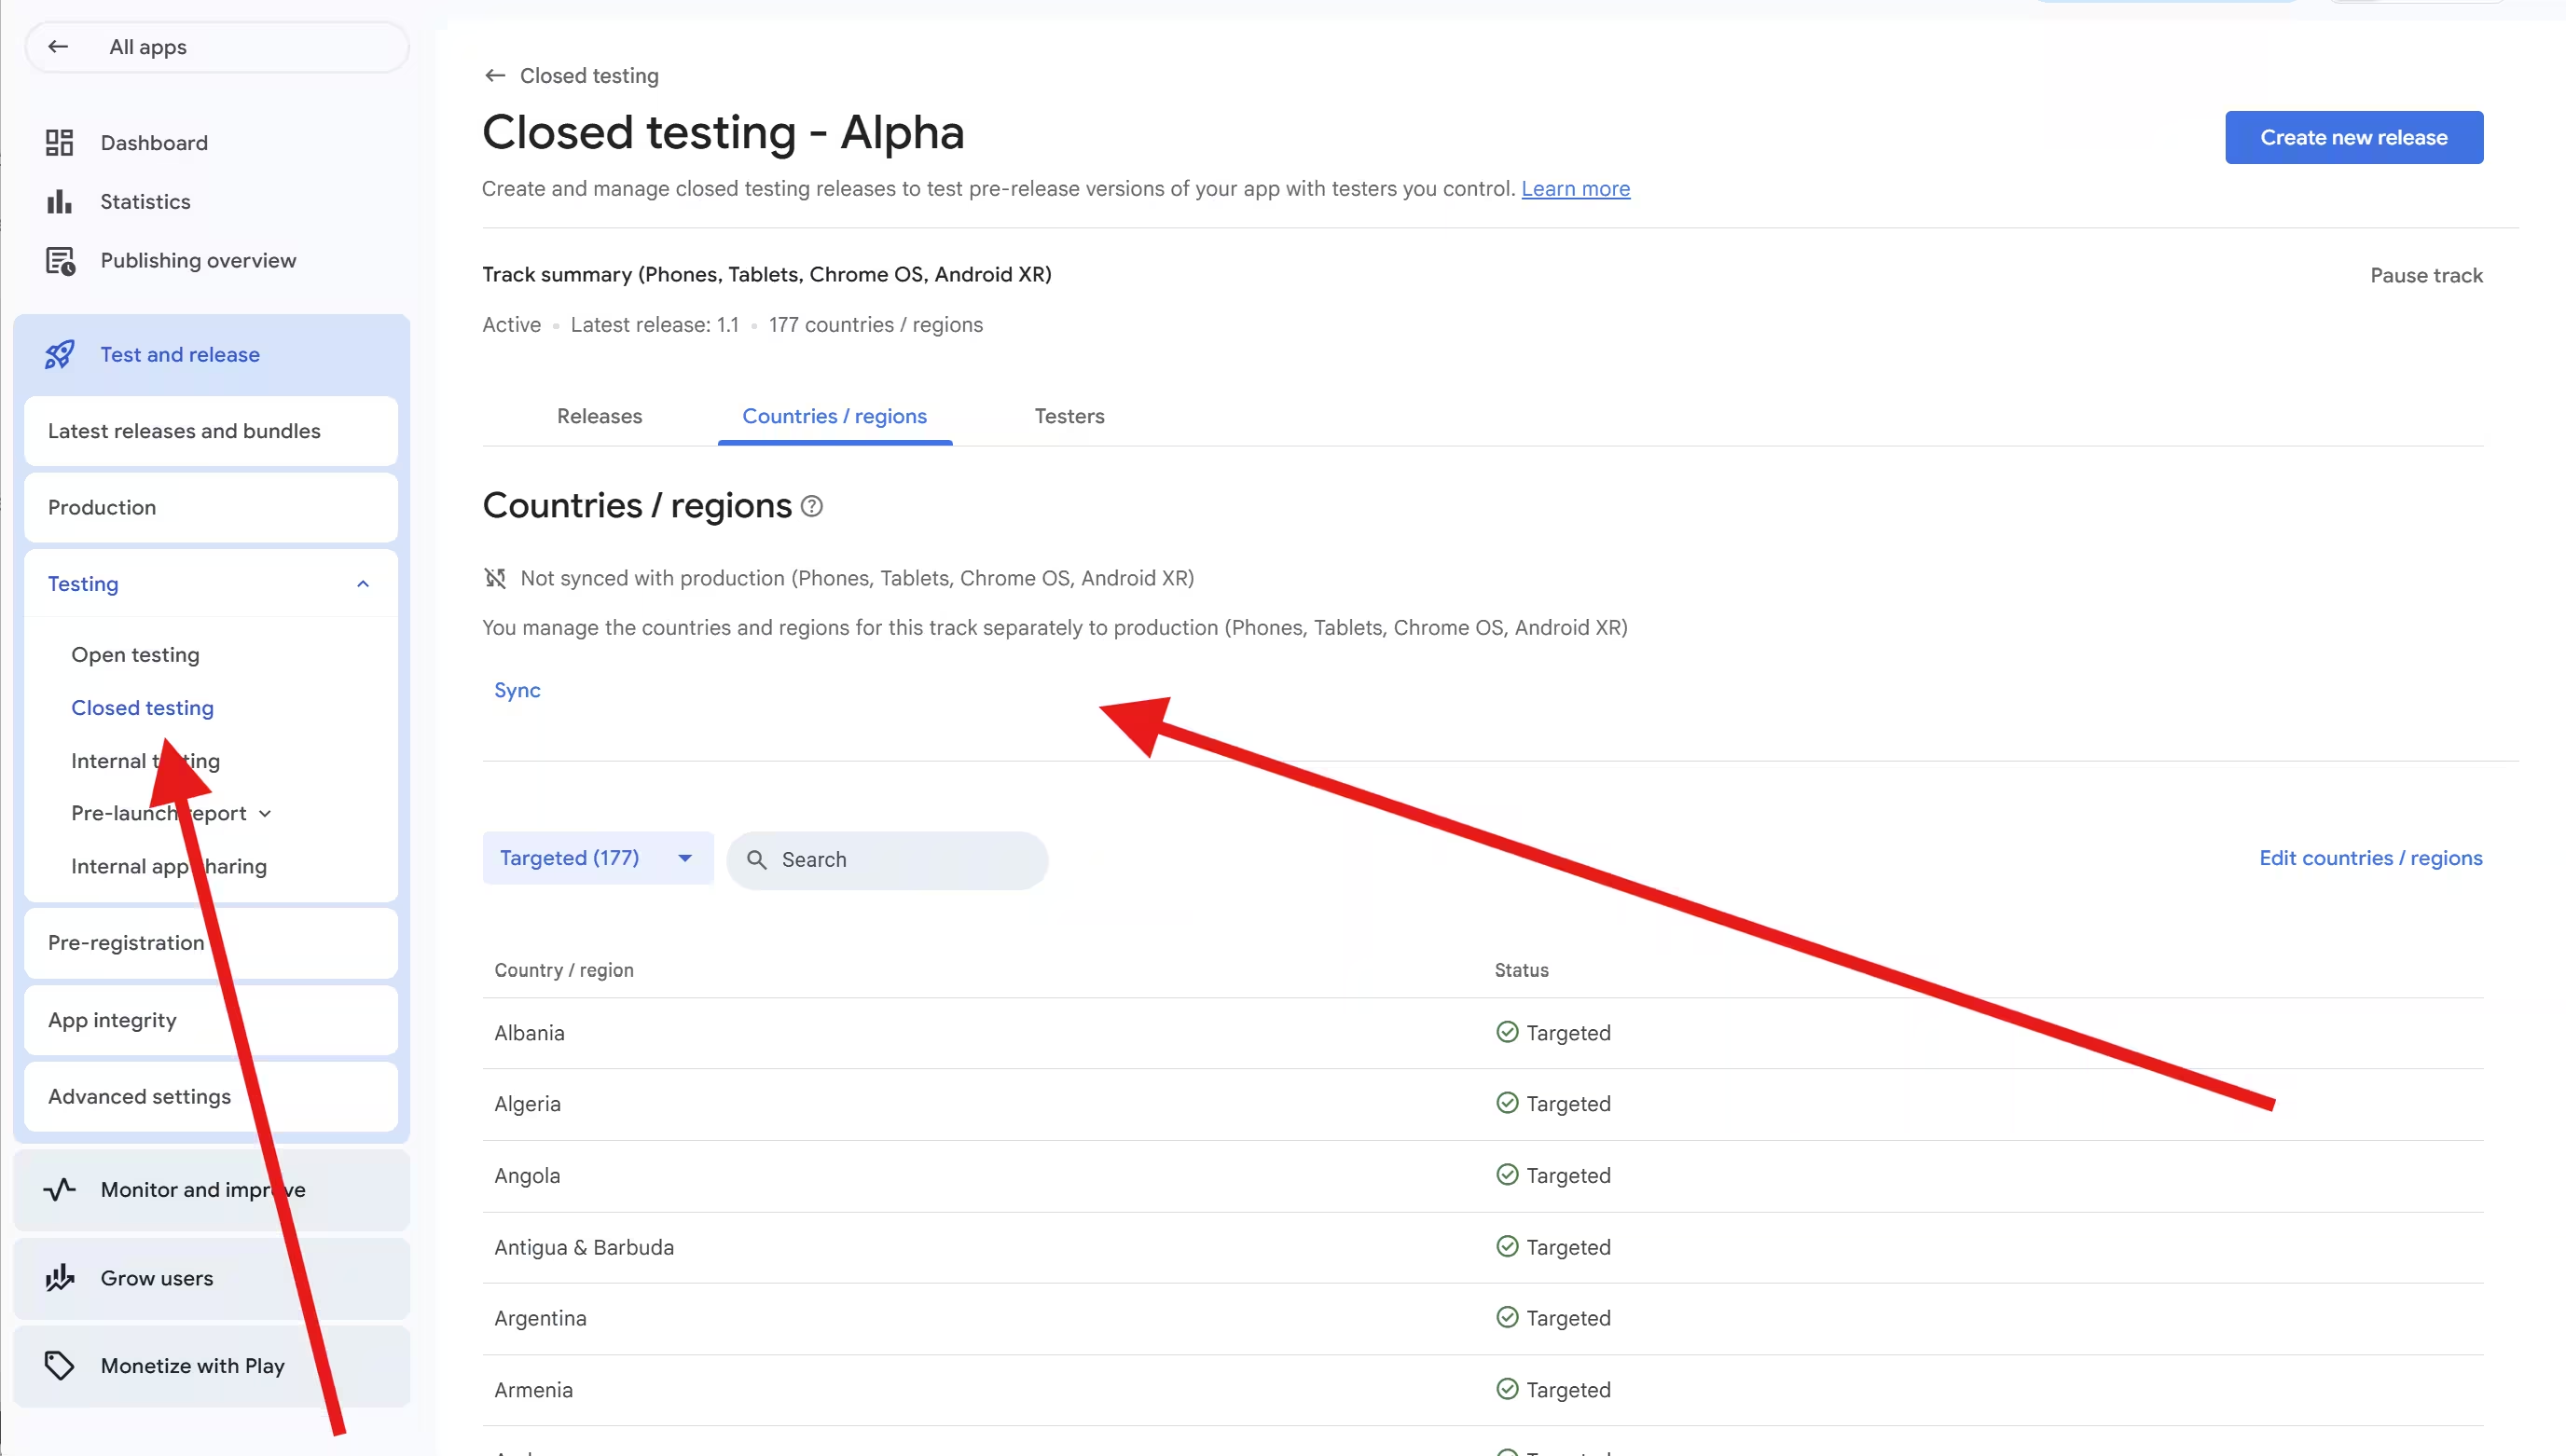 Click to enlarge
- Open the track and choose Countries / regions.
- Read the sync state shown for the track. While synced, the test follows production, and editing production changes the test.
- To target the test independently, choose Unsync countries/regions, then add the countries your testers' accounts are registered in.
- Save, then submit the change if Console shows it waiting for review.
Paid apps
Some countries may not be available for paid apps, and adding a country to a paid app adds prices for it. Joining a closed test does not make a paid app free.
If your testers are spread across regions, the testers in different countries guide covers the account-country checks in more depth.
Source: Distribute app releases to specific countries (Play Console Help).
Check review, publication and availability status
Approved, pending and available are different states, and they belong to different objects: the app, an update, and individual items such as a release or a country change. An available release can coexist with an unfinished update, so an empty queue is not the goal. The goal is that the specific release and configuration your testers need is available.
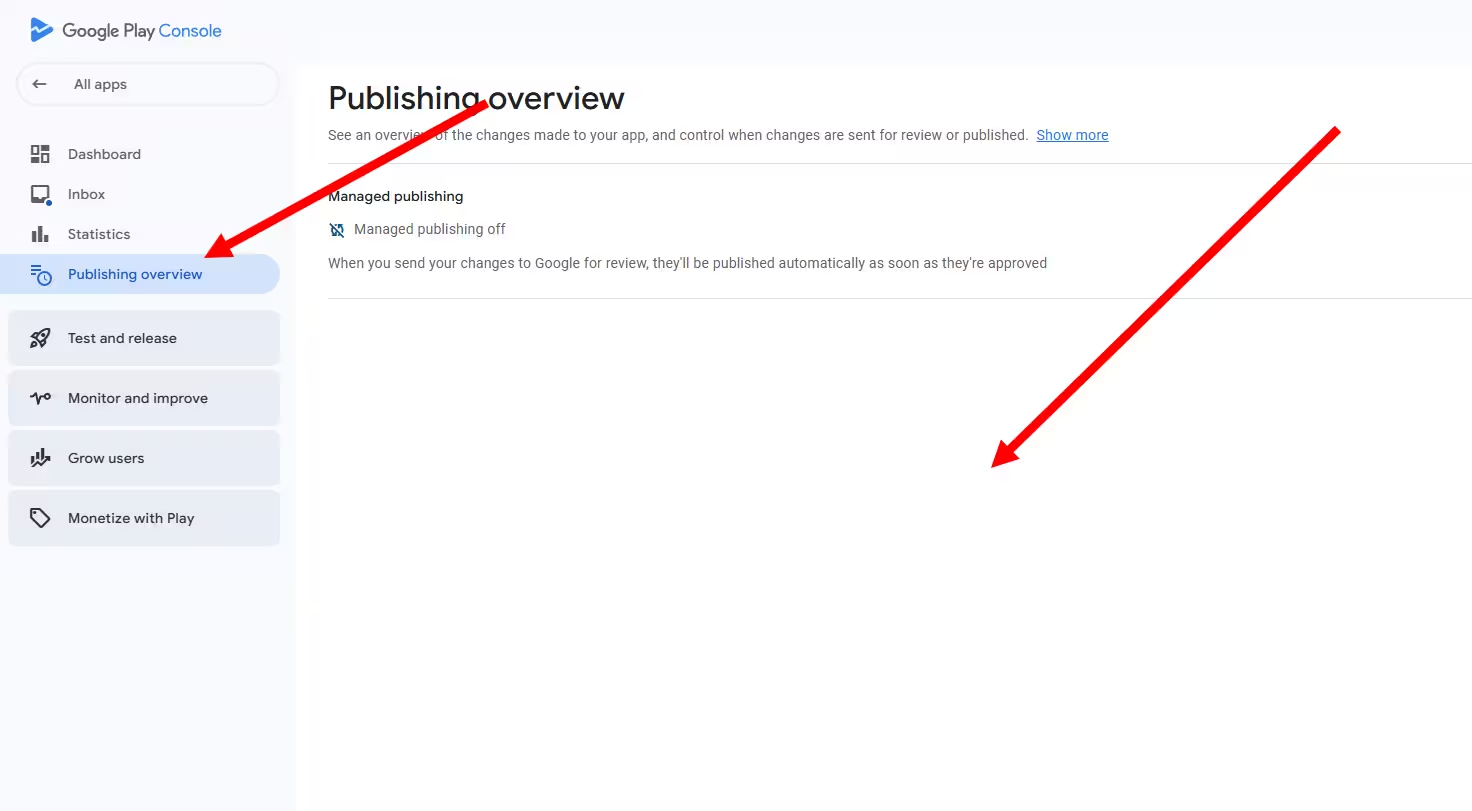 Click to enlarge
| Observed state | What to do |
|---|---|
| Draft or incomplete release | Complete the release requirements Console shows, then continue the release workflow. |
| Relevant changes not sent for review | Send the changes that need review from Publishing overview. Not every change needs it; membership edits to a selected list do not. |
| In review | Follow the displayed status and any estimate. Do not diagnose a review wait as a missing tester checkbox without evidence. |
| Approved and waiting under managed publishing | Publish the update when you want it live. Approval alone does not make it available. |
| Relevant release is available | Continue the tester checks. Allow for propagation: a newly published test link can take several hours to become available. |
| Rejected, removed or suspended | Follow that issue's own resolution path. It is outside this guide; see why closed testing gets rejected if the decision concerned the test. |
Google describes processing as taking a few hours or up to seven days, with longer exceptional cases. Treat that as planning guidance, not a promised deadline. Check the current status and any estimate shown for your submission.
Managed publishing is conditional
If managed publishing is on, an approved update waits until you publish it. Managed publishing cannot be used for an app's first publication, so a brand-new app is not held by it; a new app waits on review and then on propagation.
Sources: Control when app changes are reviewed and published, Publish your app and Set up a test (Play Console Help).
If the Tester Can Join but Cannot Install
A tester may have access to the test while their device cannot install its build. Inspect the exact device and the relevant track in Device catalog, including Android version, manifest requirements and exclusions. Do not remove compatibility requirements without understanding why they exist.
Inspect the device and relevant build
- Ask the tester for the device model, Android version and the exact message. Not available and not compatible are different results.
- In Play Console open Device catalog, search the model, and read its status for the track the tester joined. Device exclusions are managed for the app. Compatibility can differ between tracks because each track may contain a build with different manifest requirements. Inspect the relevant track's supported status before changing an exclusion.
- Compare the build's minimum Android version, required hardware features and any excluded devices with the tester's device.
- After joining, confirm that the Play Store still uses the enrolled account. Then check release availability, Play country (check 4), device compatibility and the exact installation error. If downloading fails despite eligibility, follow Google's basic download troubleshooting.
If a different version is already installed
A tester who already has the app from another track or from production may see Update instead of Install, or be refused a build whose version code is lower than the installed one. Confirm which version is on the device and which the track serves. Signing and version-code conflicts are build problems, not access problems; resolve them in the build rather than by re-inviting the tester.
Sources: View and restrict your app's compatible devices (Play Console Help) and Version your app (Android Developers), which covers the version-code downgrade limitation.
Verify Access Before Inviting the Full Group
Before sending the link to every tester, confirm the whole path once with one eligible tester account. This checklist is a manual record of what you have confirmed; it reads nothing from Play Console, and a later tester with a different account, Play country or device can still fail on their own conditions.
Your manual checks are complete, including one tester's join-and-install verification. Check any additional tester separately if their account, country or device differs.
If access works but the requirement is not progressing
For personal developer accounts created after November 13, 2023, production access requires that at least 12 testers have been opted in for the preceding 14 consecutive days at the time you apply. The period is assessed per tester: someone who leaves and rejoins must complete a new consecutive period, and the remaining testers keep theirs. If installs work but the card is not moving, read the 12-tester, 14-day requirement guide, then not enough testers or days not updating.
Source: App testing requirements for new personal developer accounts (Play Console Help).
Still Blocked? Collect These Details
If the tester checks and the five Console checks pass and a reproducible failure remains, stop cycling through the same settings. Collect the evidence below and use the support route from Play Console. Follow any timing guidance shown in Console or your support case. Avoid unnecessary submissions while changes are in review, because additional changes may delay the review. Use the evidence below to diagnose the failure before changing the release.
- Package name
- Intended track, its release, version code and the release state you see
- Date and time of the last relevant change and whether it was sent for review
- The exact message the tester sees, with a screenshot
- The stage that fails: joining, installing or opening
- Whether one tester or every tester is affected
- How enrollment was confirmed: the address in the selected list or the group membership, and the account used on the device
- The tester's Play country
- Device model and Android version, and the Device catalog status for that model
- A screenshot of the relevant Console state (track, testers, countries, Publishing overview)
Support packet template
If copying is blocked, select the text above and copy it.
Do not collect
Never ask a tester for a password or a verification code. Everything above is observable from the tester's screen or from your Console.
Route: Play Console Help, App visibility and discovery issues, which lists the checks Google expects first and the way to contact support. If the release or the production application was actually rejected, that is a different path: troubleshoot a closed testing rejection.
Optional Setup and Testing Help
If access is sorted and what you are missing is testers who will join, install and stay opted in for the full 14 days, PrimeTestLab provides them. We also go through the track, list, link, country and status settings against this guide before the first tester joins, so the access problems above are handled before the clock matters. Testing typically begins within 4-6 hours of your test link being confirmed.
Why more than 12
Each tester's continuous period is assessed individually. If one of exactly 12 leaves, you are below the count at application time until a replacement completes their own consecutive period; the others keep their progress. A few extra testers stop one dropout from moving your application date. See planning a tester buffer.
Current packages
- Meets the 12-tester count
- Real Android devices
- Full 14-day coverage
- Largest buffer above 12
- Widest device mix
- Full 14-day coverage
- Buffer above 12 included
- Broader device mix
- Full 14-day coverage
Prices are per package; the checkout shows the service fee before you pay. Compare the testing plans and setup support, or see how the service works.
Frequently Asked Questions
Why does Google Play say the app is not available to a tester I invited?
Usually the tester is signed in with an account that is not the invited one, was added to a list that is not selected on the track, or has not completed the opt-in step. Check the invited account, the selected list or group membership, and the completed opt-in before changing Console settings.
The tester joined the Google Group but still cannot join the test. Why?
Confirm the tester is a member of the group, not only invited to it, and that the group is the one selected on the track. Then the tester opts in with the same account used for the group. Group membership alone enrols nobody; the opt-in step still has to be completed.
The tester opted in but cannot install. What should I check?
Confirm that the Play Store uses the same account that joined the test. Then check the relevant release, Play country, device compatibility and any existing installed version. Use the exact error to decide whether to investigate test access, the build or a download problem.
My changes are approved, but the app is still not available. Why?
Approval is not the same as availability. If managed publishing is on, an approved update waits until you publish it. A newly published test link can also take several hours to become available, and the specific release your testers need may still be unfinished while other changes are approved.
Do closed testing and production use the same countries?
By default, yes: a test's country availability is synced with production. To target the test independently, use Unsync countries/regions on the track and then edit its countries. Google applies the tester account's registered Play country, not the tester's current location.
Why does internal testing work when closed testing does not?
Internal testing is a separate track with its own link and testers. A tester who opted in to your internal test is not eligible for the closed test until they opt out of the internal test and opt in through the closed test's link. Internal test time also does not count toward the closed testing requirement. Also check country availability and device exclusions: internal testing has exceptions that closed testing does not.
Access works, but the closed testing requirement is not progressing. What now?
That is a different problem from access. For personal developer accounts created after November 13, 2023, at least 12 testers must have been opted in for the preceding 14 consecutive days when you apply, assessed per tester. Read the 12-tester requirement guide and the days-not-updating guide rather than changing access settings.
What to Do Next
Bottom line
Treat not available as a symptom and identify the stage where access fails. Verify the invited account and the completed opt-in, then check the track, the selected list, the invitation, the countries and the publishing state, and prove access with one eligible tester before inviting everyone. If a reproducible failure survives every check, send the evidence packet to Play Console support. Once one tester can join and install, share the invitation with the group and follow the separate testing-period guide for the requirement itself.
Official sources