














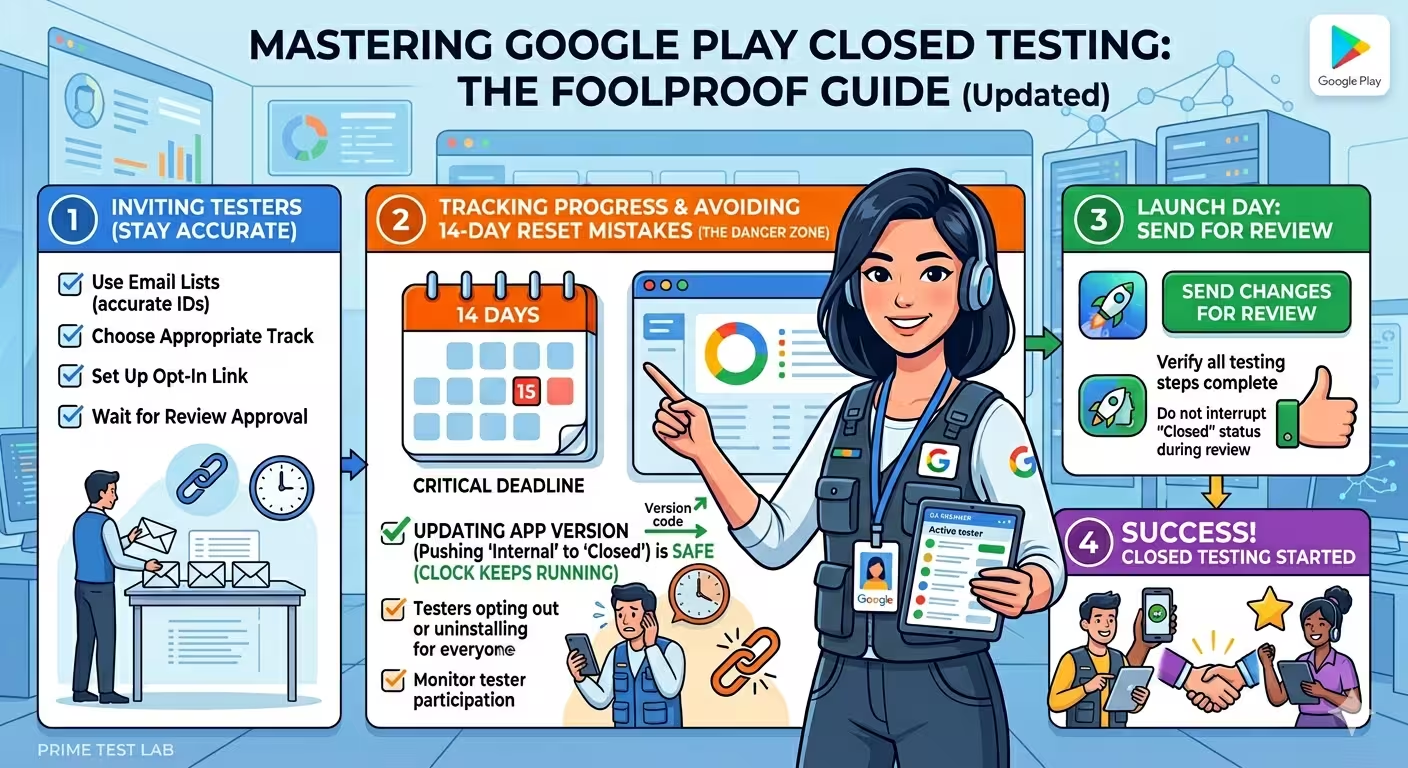
Quick Answer
To invite testers to Google Play closed testing: open Testing > Closed testing in Play Console, choose either Email list (for fixed groups) or Google Groups (for flexible groups), add at least 12 Google accounts, then copy the opt-in link and share it with each tester. The single biggest mistake: assuming "added emails = qualified testers." Only testers who actually click the link and become a tester count toward Google's 14-day requirement. To skip the recruitment hassle and guarantee 14-day completion, most developers use a professional testing service like PrimeTestLab, which provides 12-25 vetted testers from $19.99 with testing typically beginning in 4-6 hours.
If you are publishing with a new personal developer account, Google Play now requires you to complete closed testing before production access. This is exactly where most developers get stuck. They add emails. They share links. They think testers are in. Then on day 10 they discover they never had 12 testers who satisfied the full period - and they have no idea what went wrong. This guide walks through the entire invitation process step by step, explains the Invited vs Opted-in vs Installed vs Active ladder, and lists the five mistakes that quietly cost developers weeks. If you need testers fast, PrimeTestLab provides 12 to 25 vetted testers starting at $19.99 with testing typically beginning within 4-6 hours.
Table of Contents
Watch the Closed Testing Setup Walkthrough
Step-by-step Play Console tour - tracks, tester lists, opt-in links, and what to send for review

The Invitation Funnel: Why "12 Added" Almost Never Means "12 Qualified"
Here is what really happens between the moment you paste a Gmail address into Play Console and the moment that tester actually counts toward your 14-day cycle. Most first-time publishers stop counting at step 1 - and then wonder why Google still shows "not enough testers."
The math nobody tells you: if you want 12 testers active for 14 days from random outreach, you typically need to invite 25-30 people just to land 12 who survive the full cycle. This is the single biggest reason developers get stuck for weeks.
What a Broken Opt-In Really Costs
up to +14 days
A tester who breaks their opt-in starts their own 14-day period again - the earlier days do not bank. Google publishes no rule that erases the periods your remaining testers have already completed, so what a break really costs you is the wait for a twelfth qualifying tester, not everyone’s progress.
How to Prepare for Google Play Closed Testing
This is the part most guides skip. Before you start clicking around in Play Console, get these five things ready. Skipping prep work is the single most common reason cycles drag on for weeks instead of finishing cleanly. We onboard 9,800+ apps using a five-step preparation sequence, and the order matters - each item depends on the one before it.
A signed Android App Bundle (AAB) ready to upload
Closed testing requires an AAB, not an APK. Generate it in Android Studio with Build > Generate Signed Bundle / APK > Android App Bundle. If this is your first upload, accept Play App Signing when Play Console prompts.
Tip: set versionCode at least 1 higher than any previous test build before you generate the AAB. Reusing a versionCode is the most common upload error.
Your tester pool - emails OR a Google Group address
Decide upfront: are you uploading a list of individual Gmail addresses, or pointing Play Console at a Google Group? If you are using a service like PrimeTestLab, you typically just paste their official Google Group address (e.g. khadem-testers-service@googlegroups.com) and skip CSV management entirely.
Tip: add the entire pool of testers you have access to, not just 12. We cover why in Step 2.
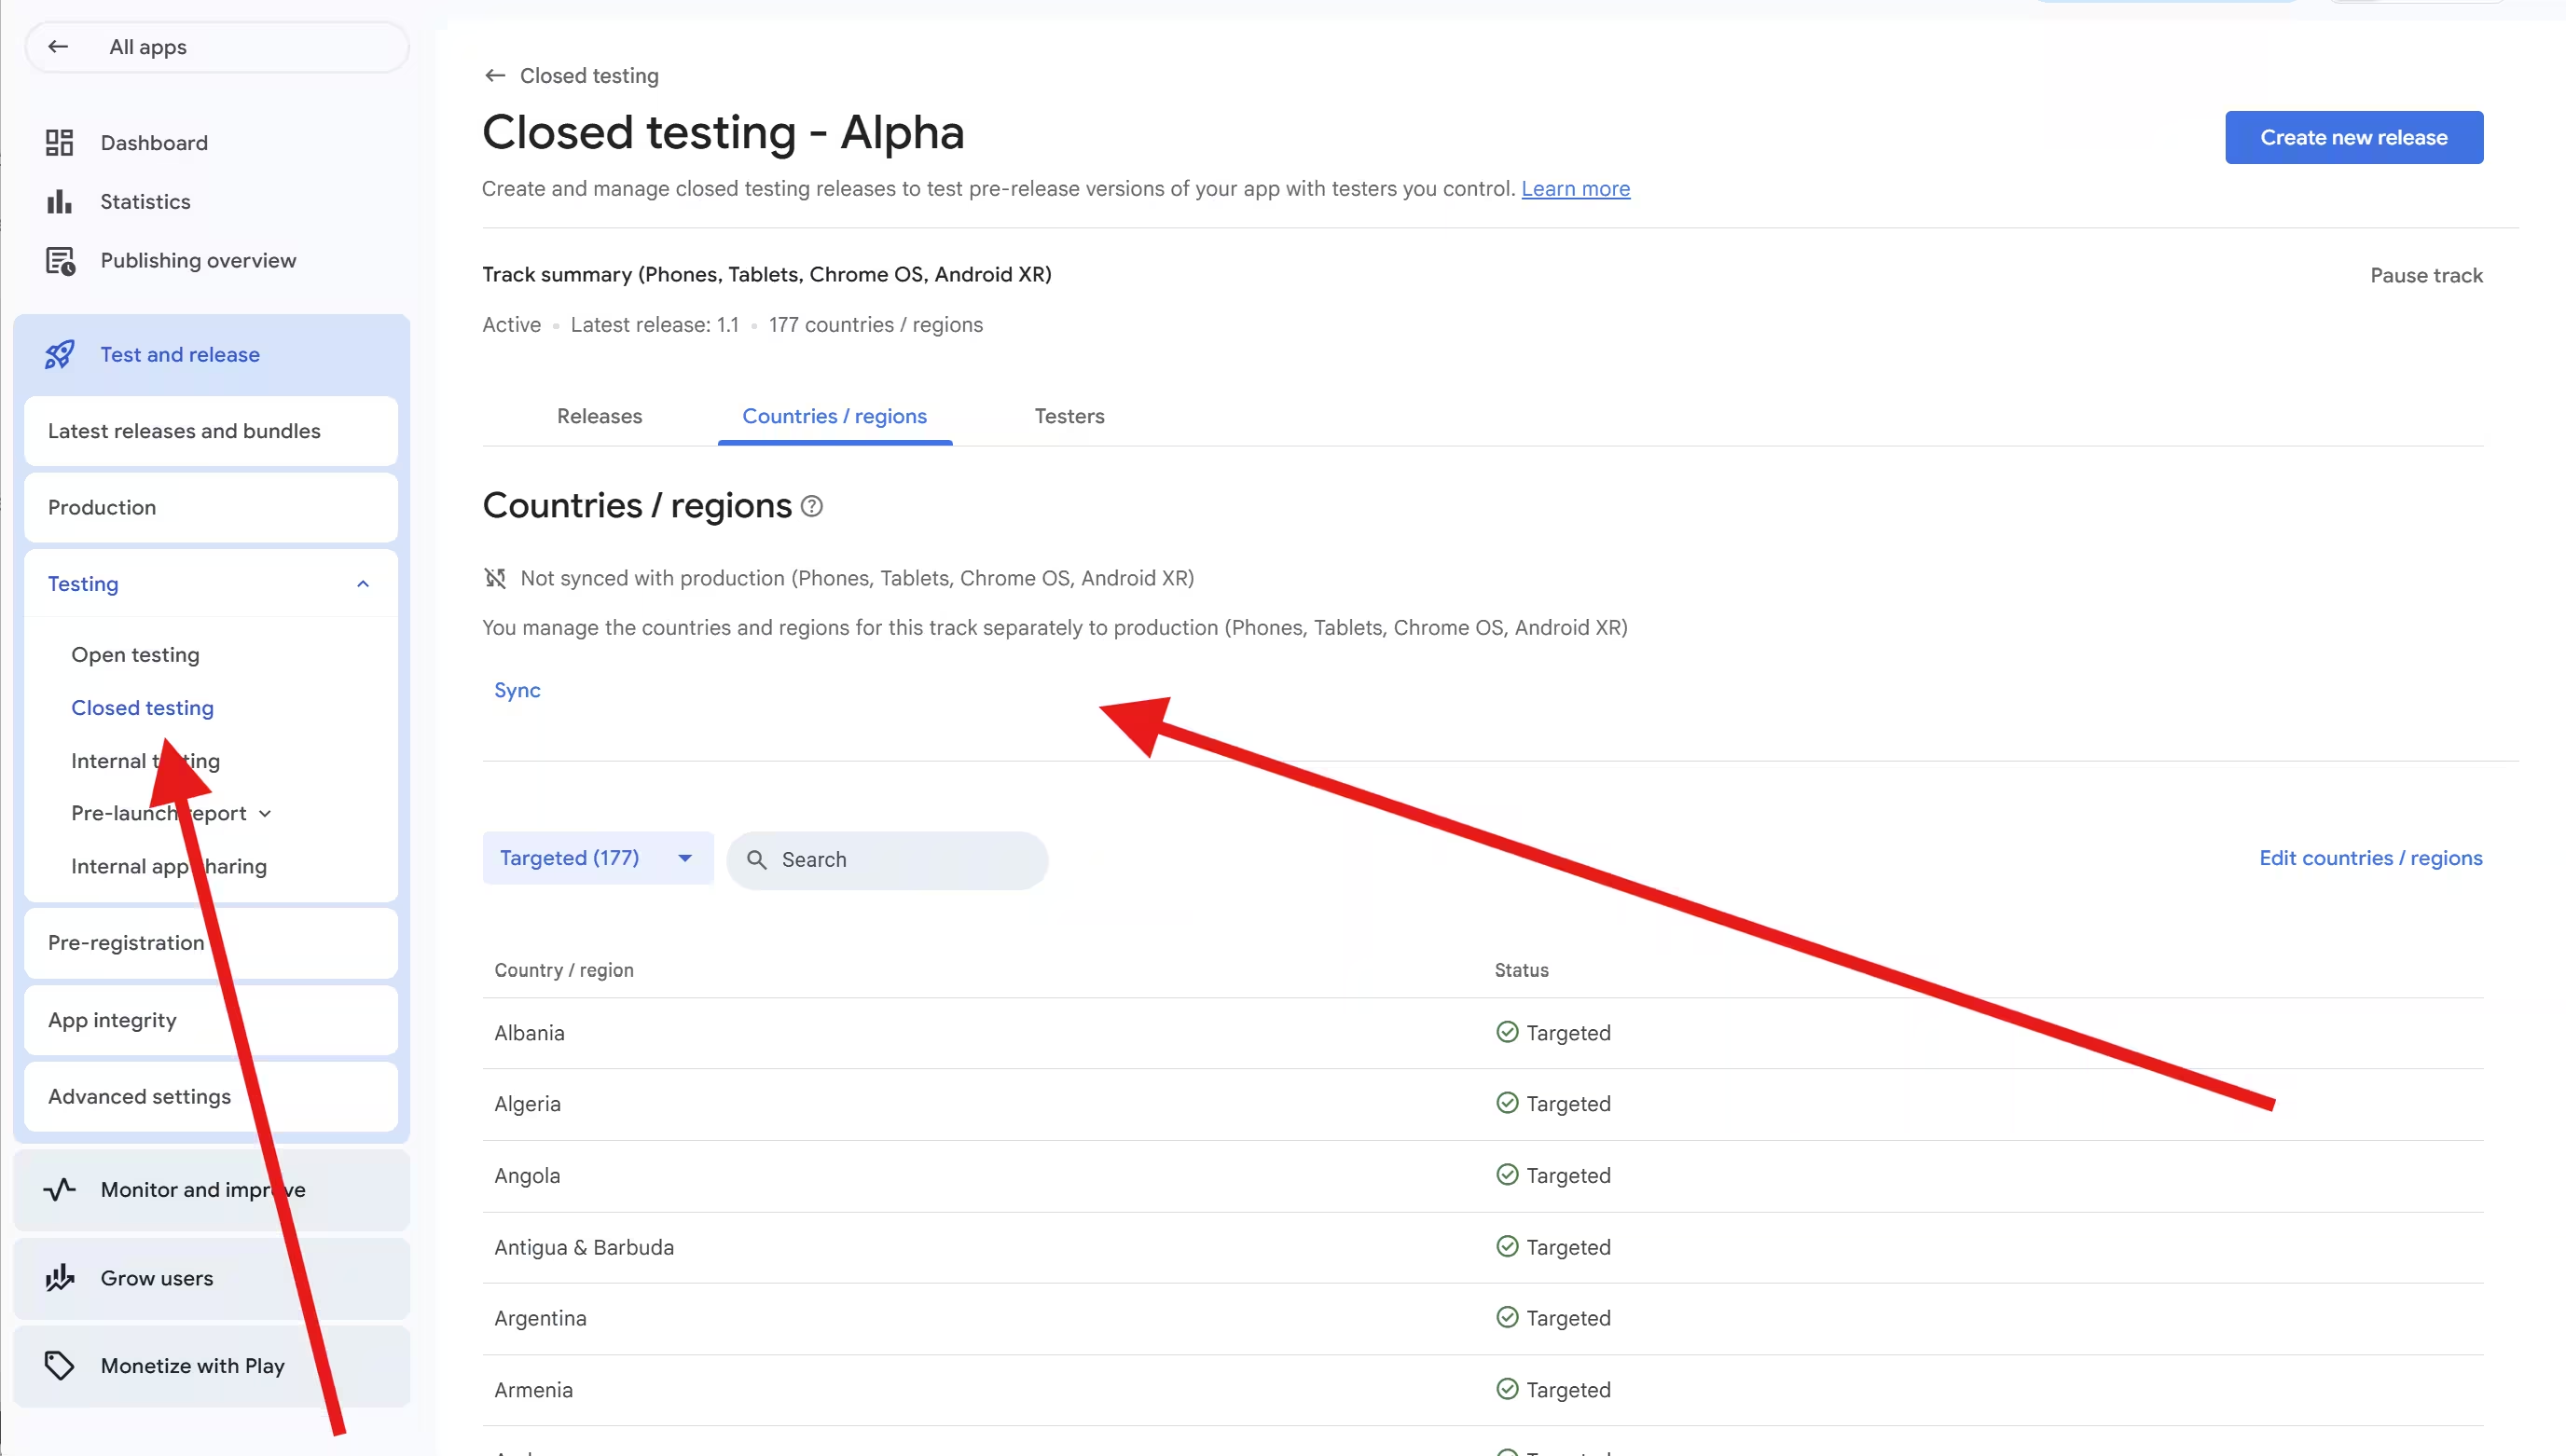
The full country list ready to select (ideally all 177)
Closed testing country settings are independent of your production launch. Even if you only plan to launch in one country, select every region available so testers from anywhere can install. Restricting countries here is one of the most common reasons testers report "app not available."
Store listing essentials completed
Before Google will approve your closed testing release, you typically need: a privacy policy URL, a completed Data safety form, a content rating questionnaire, and a target audience declaration. Open Publishing overview and Google will list anything still pending.
A reminder schedule for days 2, 7, and 11
If you are inviting friends, family, or anyone you found online, the cycle dies without nudges. Schedule reminders before you ever send the first invite - we provide copy-ready templates below for each one. Skip this and your day-12 active count will quietly fall under 12.
The 5-Step Preparation Flow
These five items mirror the real onboarding flow we walk every PrimeTestLab customer through: (1) add testers, (2) configure all countries, (3) submit changes for Google review, (4) share the live testing link, (5) monitor and start testing. The order is not arbitrary. Skip step 4 (the live link) and our team has nothing to verify. Skip step 2 (countries) and step 3 fails review.
Step 1: Set Up Your Closed Testing Track in Play Console
Before you can invite anybody, you need a closed testing track to invite them to. If you already have a track and an active release, skip ahead to Step 2.
Open Play Console and select your app
Go to play.google.com/console. From the app list, click into the app you want to put through closed testing.
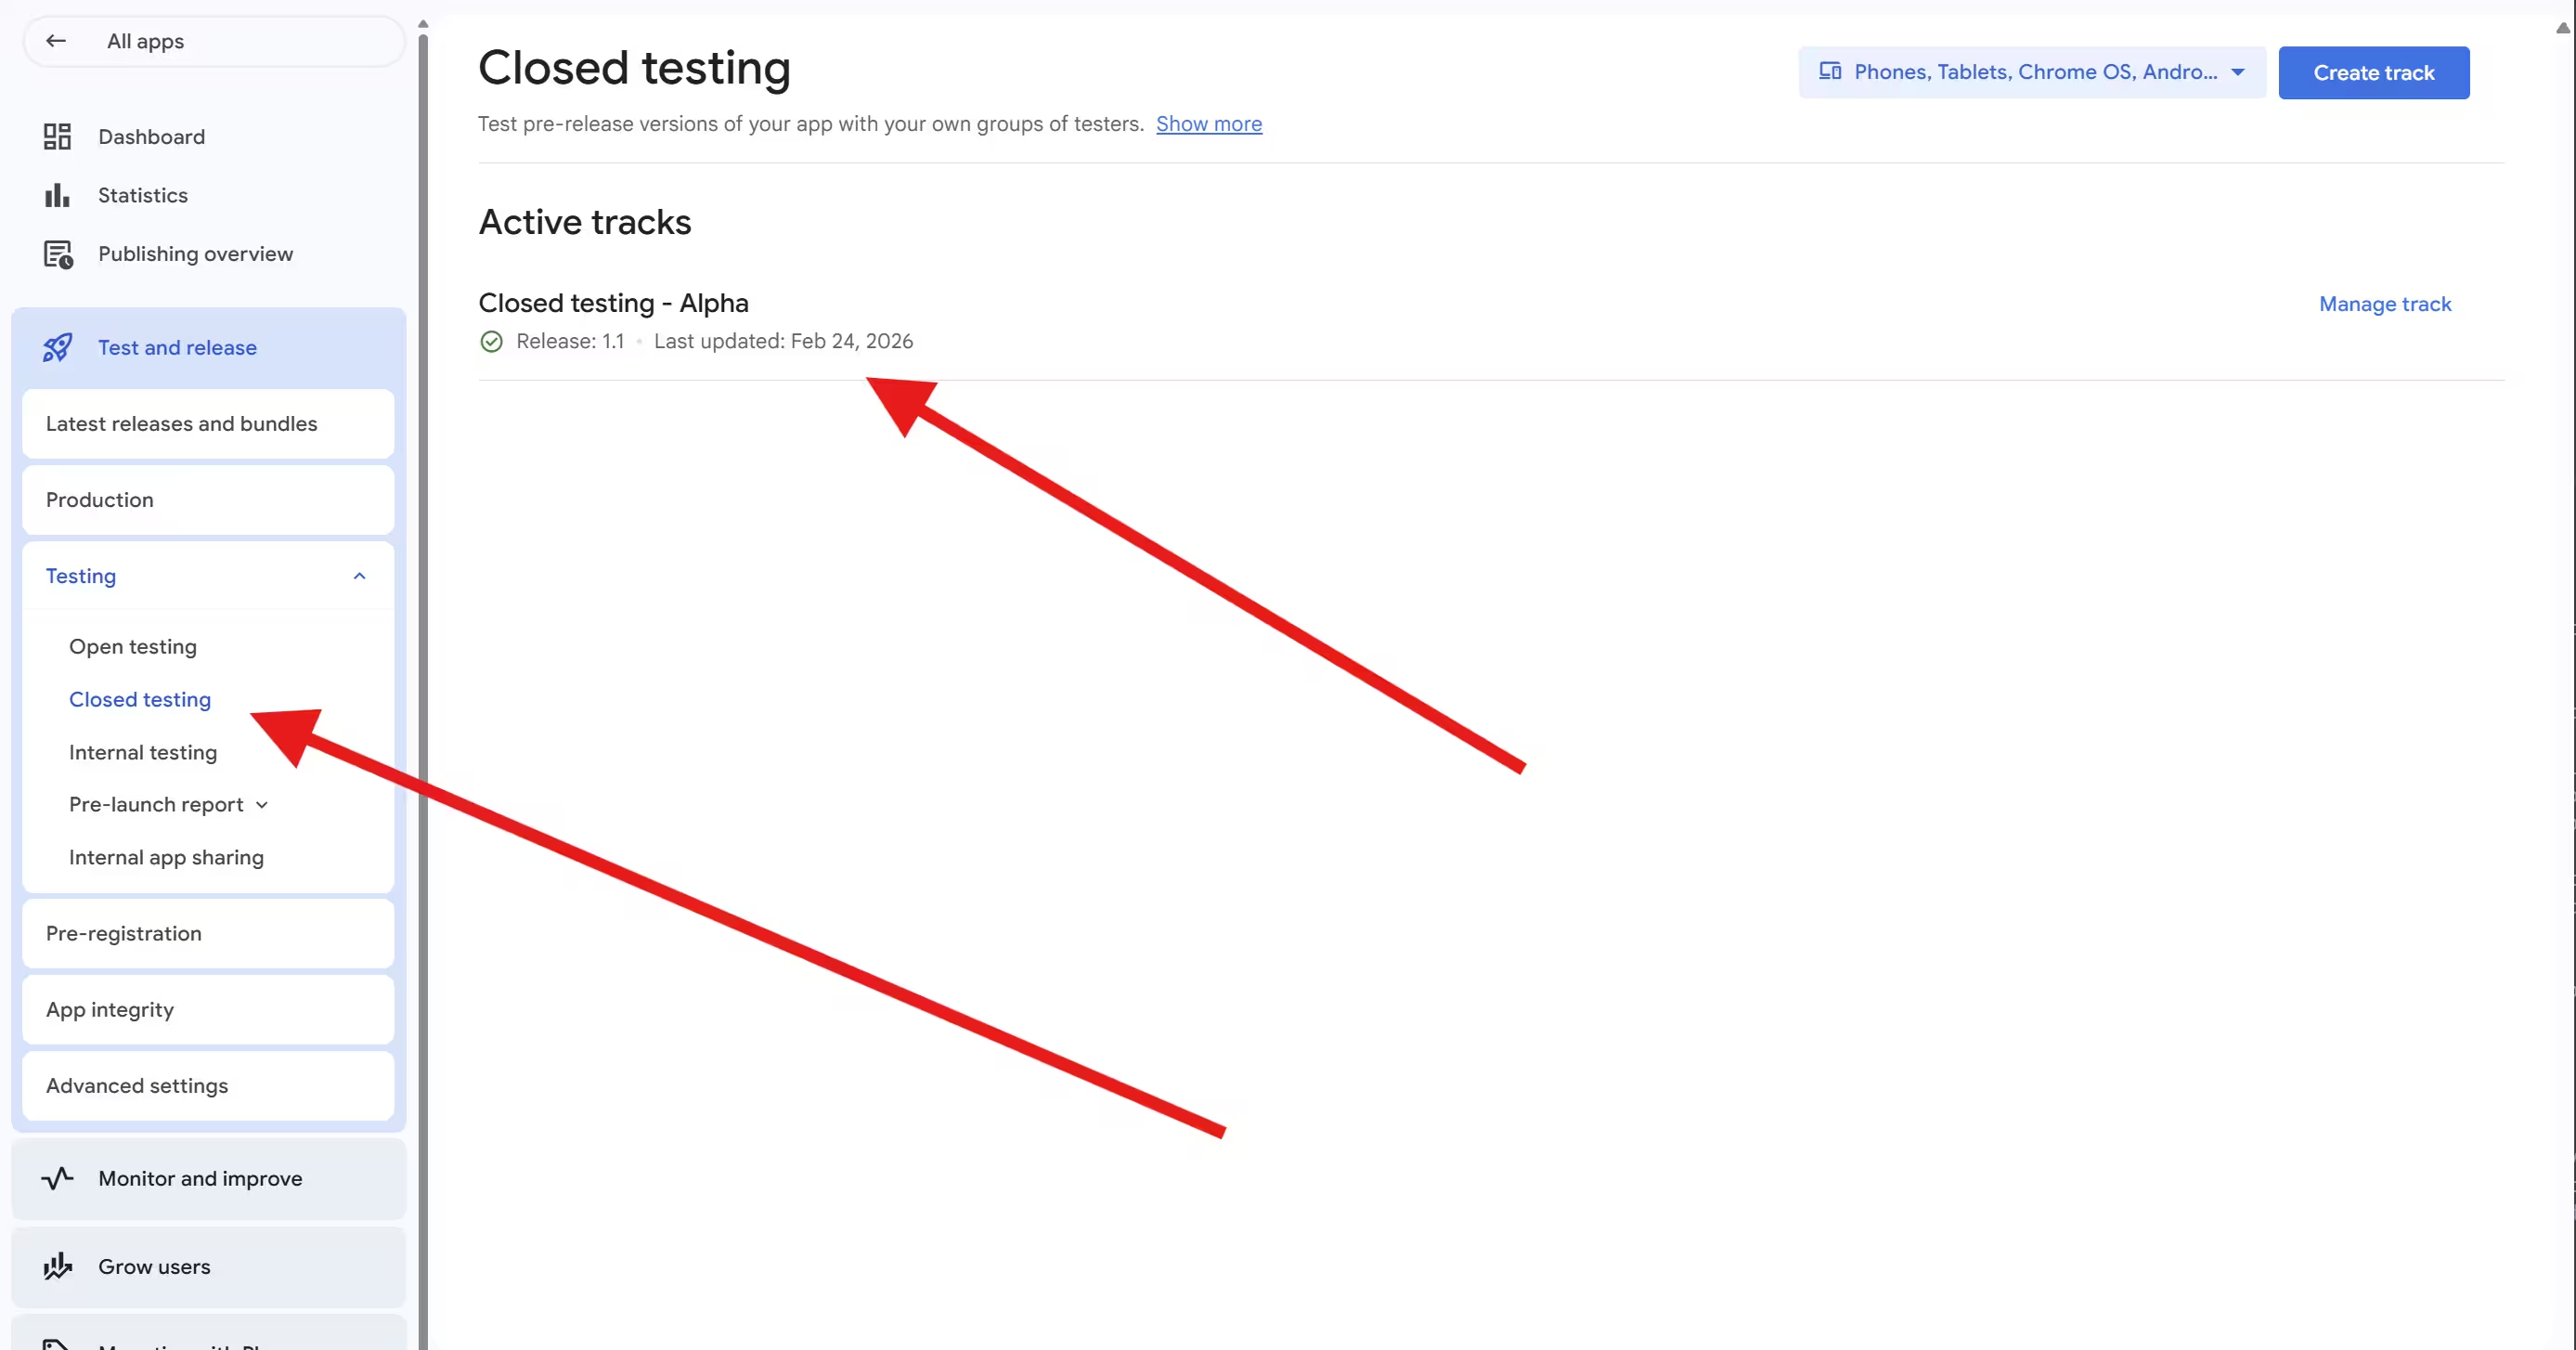
Navigate to Testing > Closed testing
In the left sidebar, expand Testing and click Closed testing. You will see one or more tracks (defaulting to "Alpha"). Pick one or click Create track to name your own.
Click "Create new release"
Inside your track, click Create new release. Upload your AAB file, write release notes (a single sentence is fine), and click Save.
Tip: if you have not signed an upload key yet, Play Console will walk you through Play App Signing the first time you upload. Accept the defaults unless you have a strong reason to manage your own keys.
Review and roll out
Click Review release, fix any warnings, then Start rollout to closed testing. The release will sit in "Pending review" with Google for ~20-30 minutes before going live.
Pro Tip
If your release is stuck in "Pending review" for more than a few hours, it is almost always because you have not finished a related store listing item (privacy policy, content rating, target audience, data safety). Open Publishing overview in the sidebar and Google will show you exactly what is missing.
If your closed testing track is set up but testers say they cannot see the app, that is a separate (and very common) problem. We covered it in detail in our app not available to testers guide.
Step 2: Choose How to Add Testers - Email List vs Google Groups
Google Play gives you two ways to add testers to a closed testing track. They behave very differently in practice. Use the wrong one and you will spend an extra hour every time you need to add or remove a tester.
Individual Email List
Best for: small, fixed groups (under 20 testers).
- Quick to set up - paste emails or upload CSV
- Lives entirely inside Play Console
- Editing the list = re-uploading + re-saving
- Hard to manage when testers come and go
- Easy to forget the "tick the checkbox" step
Google Groups
Best for: ongoing testing, larger groups, organizations.
- Add or remove testers in the Group, no Play Console edit needed
- One opt-in link works forever
- Cleaner audit trail - you see who joined and when
- Requires creating a Group at groups.google.com first
- Members must allow viewing content + external members
Method 1: Individual Email List - Step by Step
- Inside your closed test track, click Testers.
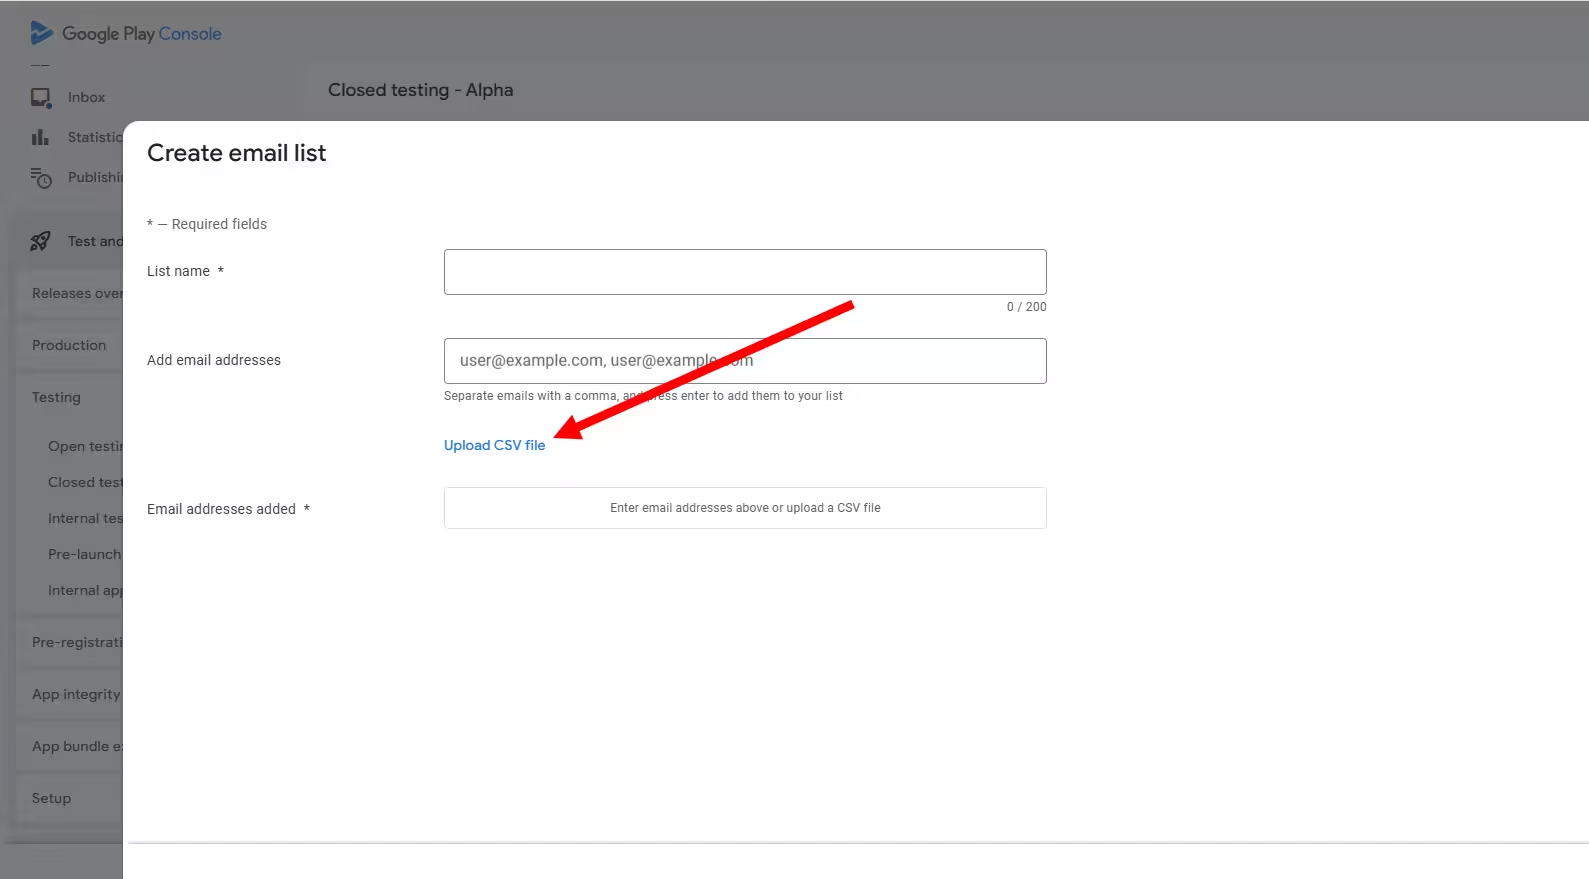
- Choose Create email list, give it a name (e.g. "Beta Cohort 1").
- Paste emails one per line, or upload a CSV.
- Click Save changes.
- Tick the checkbox next to your list on the Testers page. This is the step everyone misses.
- Click Save at the bottom of the page again.
Critical
Uploading a CSV creates the list. Ticking the checkbox attaches it to the track. They are two separate operations. Skip the second one and your list is invisible to your release.
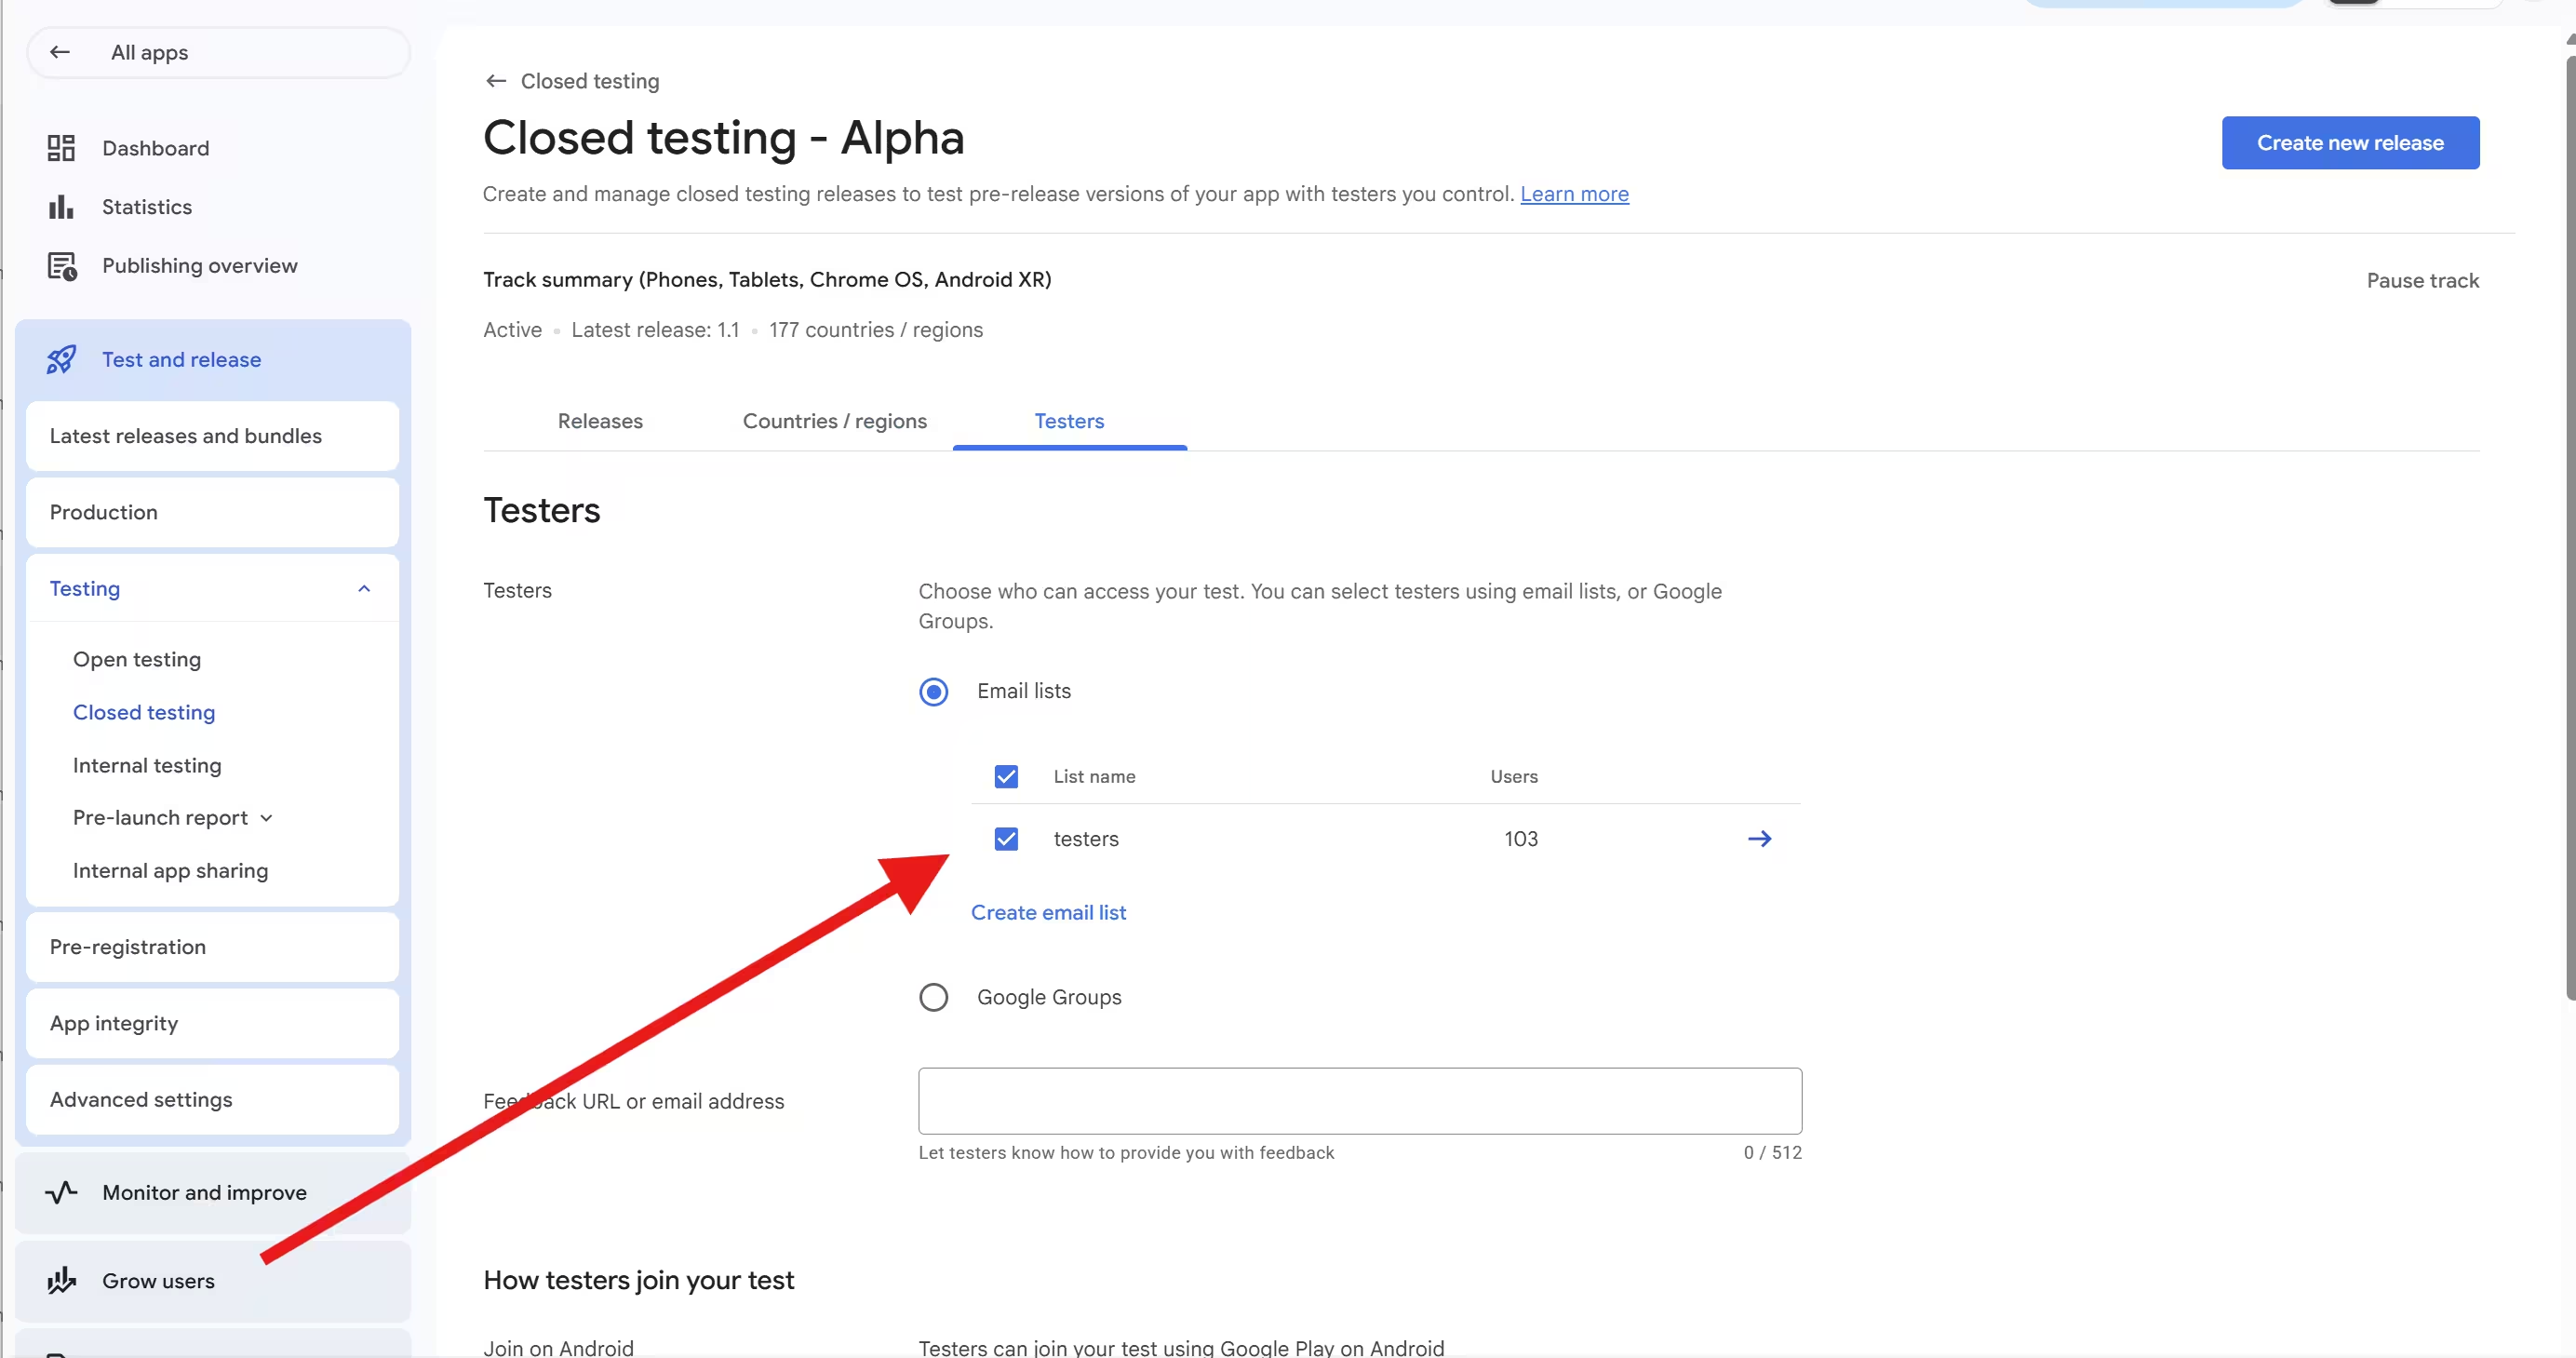
Don't Add Just 12
If you have access to a larger pool of tester emails (for example, the full CSV from a testing service), upload all of them, not just the 12 you think you need. Only a fraction of any pool actually opts in and stays active for 14 days. If you upload exactly 12 and one tester drops out on day 6, you no longer have 12 testers who will satisfy the full period, and your eligibility date moves out until a replacement completes their own 14 days. Always import the full list, then let the natural opt-in rate land you above 12.
Method 2: Google Groups - Step by Step
- Go to groups.google.com and click Create group.
- Set the group type to Email list. Name it (e.g. "myapp-closed-testers").
- Under Group settings > Member privacy, allow External members.
- Under Posting policies, allow members to view conversations (or set the visibility your team needs).
- Add your initial testers via Members > Add members directly.
- Back in Play Console > Closed testing > Testers, choose Google Groups, paste the group's email address, and save.
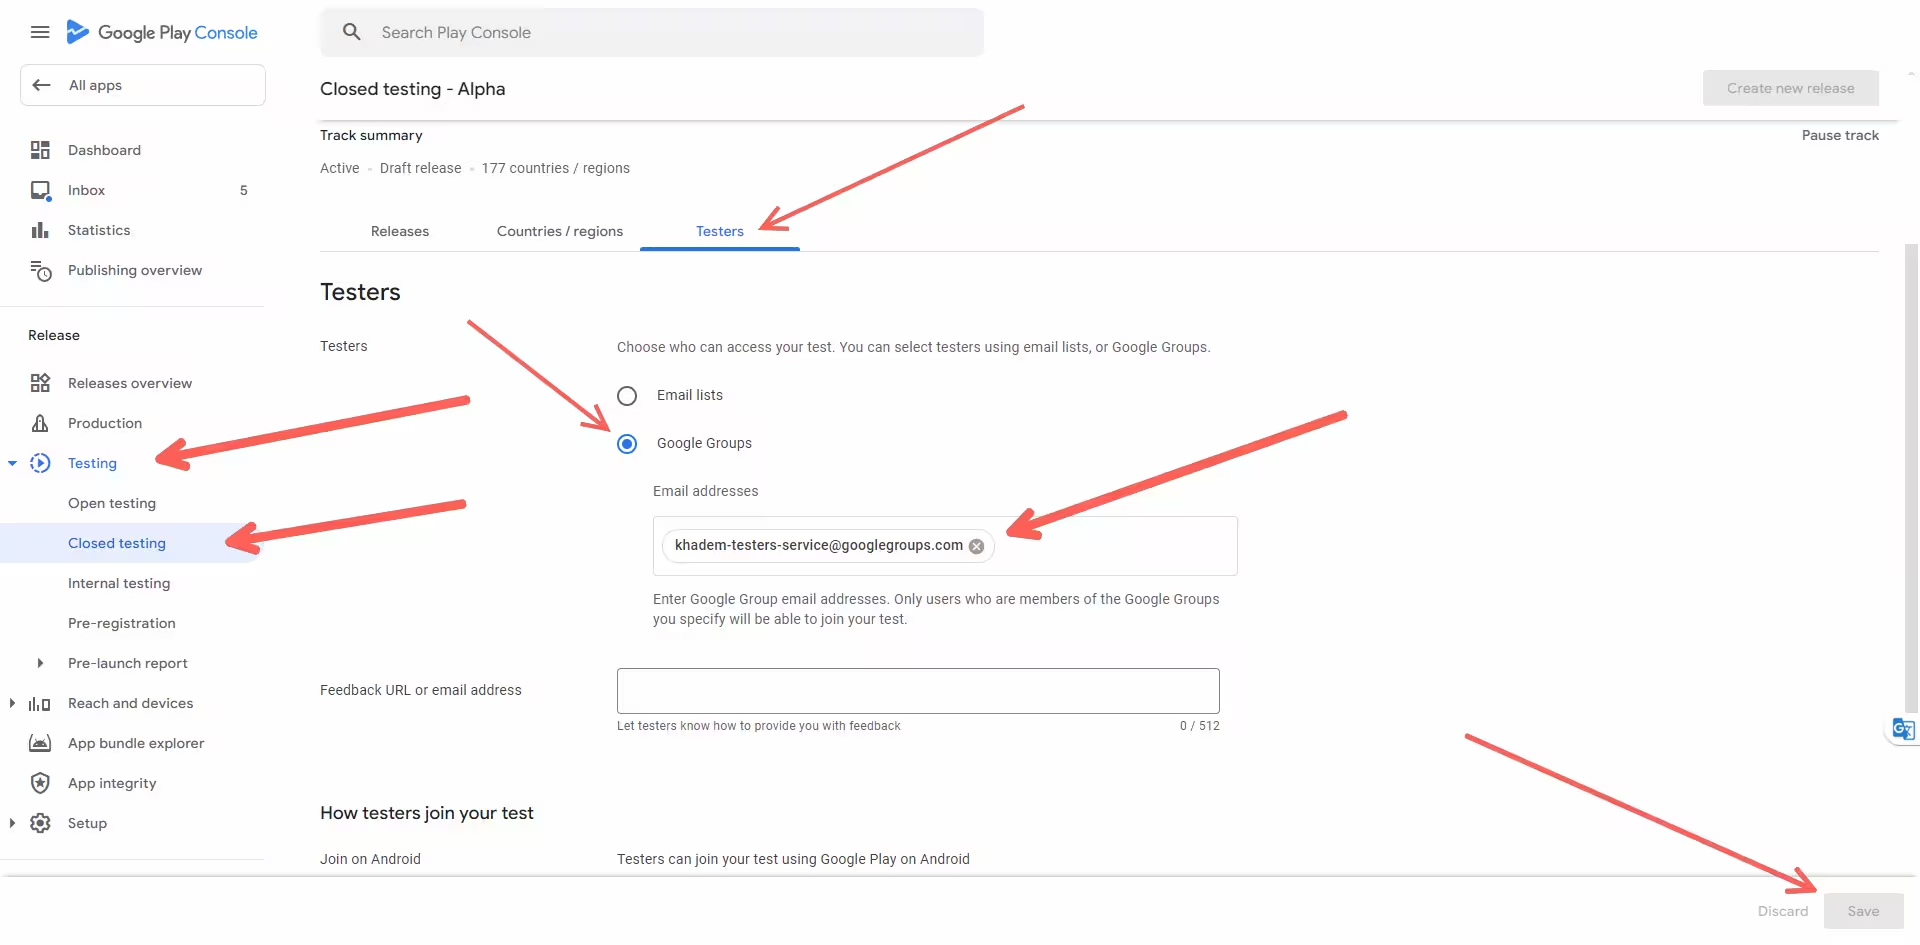
Why Groups Win Long-Term
Once a Google Group is wired into Play Console, you never touch Play Console again to manage testers. Need to swap out a tester? Add them to the group and remove the old one. The opt-in link stays the same and the track stays the same - but the tester you added is starting their own 14 days, so swapping people late still moves the date you can apply.
Step 3: Generate and Share the Opt-In Link
This is the step most developers misunderstand. Adding someone's email is not enough. Each tester must open the opt-in link, sign into their Google account, and click "Become a tester." Without that click, they are invited but not opted-in - and they do not count.
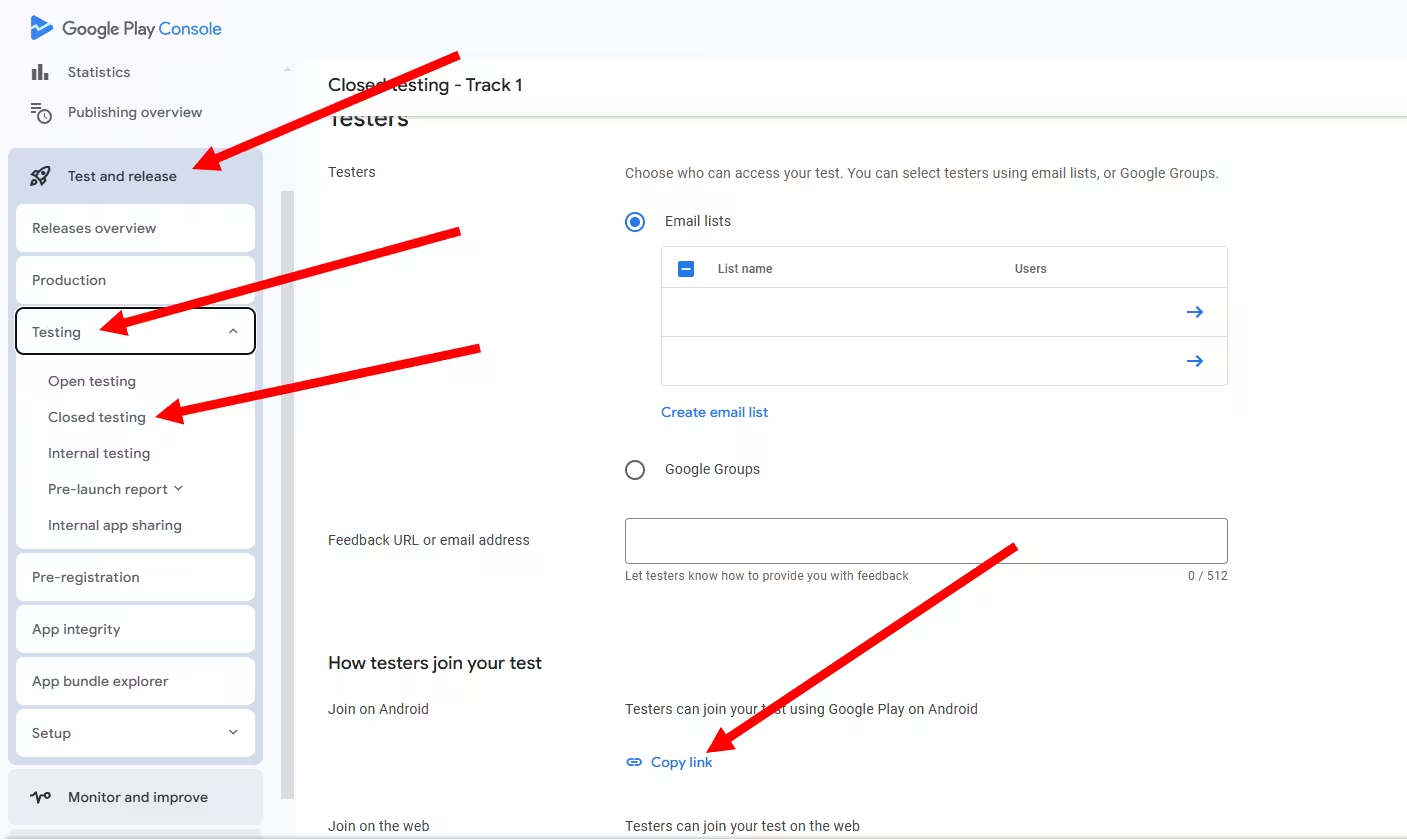
The Anatomy of a Closed Testing Opt-In URL
Closed testing opt-in URL structure
internaltest.
Common Trap
If your URL contains internaltest, you copied the link from the Internal testing tab. Internal testing time does not count toward your 14-day production access requirement. Only links containing /apps/testing/ count.
Both of these closed testing link formats are valid:
https://play.google.com/apps/testing/com.yourapp.name
https://play.google.com/store/apps/details?id=com.yourapp.name
The /apps/testing/ URL is the dedicated opt-in landing page. The /store/apps/details?id= URL routes the tester through the Play Store directly - which works once they have already opted in via the first link. When sharing with a testing service, the /apps/testing/ link is preferred.
How Testers Actually Opt In
Tester opens the link on their phone or desktop
The opt-in landing page must be opened in a browser, not through the Play Store app. Mobile browser is fine.
Signs into the Google account they were invited under
The account they sign in with must match the email on your tester list (or be in your Google Group). Mismatched accounts cannot opt in.
Clicks "Become a tester"
This is the step that flips them from invited to opted-in. The page then shows a Play Store install link.
Installs the app from the Play Store link
The Play Store link is account-bound. If they tap it on a phone signed into a different Google account, they will see "App not available." They must open the Play Store under the same account they opted in with.
Testers Reporting "App Not Available"?
If multiple testers report the app is not available even after clicking the opt-in link with the right account, the issue is almost never your testers - it is a Play Console configuration problem. The five most common causes (track mismatch, unticked tester list, wrong link, country restrictions, pending review) are covered in our dedicated guide: Google Play app not available to testers: what to check.
Demo Account & License Testing: The Two Settings Most Indie Devs Miss
Even when your testers are perfectly opted-in and installed, the cycle can still die quietly. The two most common silent killers: your app has a login wall and testers cannot get past it, or your app has in-app purchases and testers cannot test paid flows without being charged real money. Both have dedicated Play Console settings that almost nobody fills in correctly the first time.
Demo Account / App Access
Required if: your app has a sign-in screen, gated content, or restricted features.
- Provides Google's reviewer with working credentials
- Helps testers bypass invite-only or paid signup walls
- The credentials MUST stay working for the full 14 days
- Skipping it on an auth-walled app = automatic Google rejection
License Testing
Required if: your app has in-app purchases, subscriptions, or paid features.
- Lets specific Gmail accounts test purchases without real charges
- Returns simulated successful or declined responses
- Only accounts on this list get test mode - others pay real money
- Forget this and your testers will refuse to test paid features
Setting 1: Demo Account (App Content > App Access)
If a Google reviewer or one of your testers opens your app and is greeted with a login screen, they need credentials. Play Console has a dedicated field for this called App access. Filling it in is non-negotiable for apps with auth walls.
Open App content > App access
In Play Console's left sidebar, go to Policy > App content, then click App access.
Select "All or some functionality is restricted"
If your app has any locked content, choose this option. Otherwise the form is locked to "All functionality is available without restrictions" and you cannot add credentials.
Click "Add new instructions"
Fill in: Name (e.g. "Demo login"), Username, Password, and Instructions explaining how to use the demo account. Specify which features it unlocks.
Save and submit for review
This change has to go through Publishing overview > Send changes for review like every other Play Console change.
Demo account instructions template (paste into App access)
The Most Common Demo Account Mistakes
(1) Putting a placeholder like "test/test" that does not actually log in. (2) Setting up 2FA on the demo account so the reviewer is blocked at the OTP screen. (3) Letting the demo account expire mid-cycle. (4) Forgetting to specify which features the demo account unlocks - reviewers will not guess. All four lead to closed testing rejection.
Setting 2: License Testing (Settings > License testing)
If your app has any kind of paid product - one-time IAPs, subscriptions, consumables, anything that hits Google Play Billing - your testers will not test those flows without protection from real charges. Google's solution is License testing: a list of Gmail addresses that get sandbox responses for billing calls instead of real transactions.
Open Setup > License testing
In Play Console's left sidebar (not inside the app - this is at the account level), go to Setup > License testing.
Add the Gmail addresses of every tester
Paste in the same Gmail accounts you added to your closed testing track. Each one needs to be here separately - being on the tester list alone is not enough.
Tip: if you are using a service like PrimeTestLab, your dashboard provides the same list of tester emails for both purposes - you can reuse the CSV for License testing.
Set the license response
Choose RESPOND_NORMALLY for realistic testing. Other options like LICENSED or NOT_LICENSED force a specific response and are useful for verifying error paths.
Save - no Google review needed
License testing changes take effect immediately. Unlike most Play Console settings, you do NOT need to send this through Publishing overview.
When You Need Which Setting
| Your App Has... | Demo Account | License Testing |
|---|---|---|
| Login / signup wall | Required | Not needed |
| In-app purchases | If gated | Required |
| Subscriptions | If gated | Required |
| Free, fully open, no IAP | Not needed | Not needed |
| Login + IAP combo | Required | Required |
Why This Connects to Reset Risk
Testers blocked at a login screen will eventually open the app fewer times, then forget about it, then uninstall. Testers asked to pay real money to test a subscription will not test it - and may opt out entirely. Both situations quietly erode the number of testers who will still be opted in and engaged at the end of the 14 days. Most "the cycle reset and I have no idea why" stories trace back to missing demo credentials or missing license testing accounts - and to never having had 12 qualifying testers in the first place.
For a deeper look at why testers leave mid-cycle and how to keep them engaged, see our guide on why you need more than 12 testers.
The Status Ladder: Invited vs Opted-In vs Installed vs Active
Here is the most important mental model in this entire guide. Google's 12-tester requirement is not "12 invited" or even "12 installed." It is "12 opted-in testers, actively keeping the app for 14 continuous days." Each rung up the ladder is a separate filter that drops your real count.
-
Invited
1. Invited
You added the email to your tester list (or Google Group). The tester has no idea yet.
Counts toward Google's 12? No
-
Opted-in
2. Opted-In
Tester clicked the link, signed in, hit "Become a tester." They are now a confirmed tester on Google's books.
Counts toward Google's 12? Yes - the moment they opt in
-
Installed
3. Installed
App is downloaded and present on a real device under that Google account. Required for any tester signal Google sees.
Counts toward Google's 12? Yes - and Google starts logging activity
-
Active 14d
4. Active for 14 Continuous Days
Tester kept the app installed and the account opted-in for the full 14 days without interruption. This is the only state that completes the requirement.
Counts toward production access? Yes - this is the finish line
The Cycle Starts When
Each tester’s 14 days start when that tester opts in, and the app has to be available on the closed track for the period to be worth anything. Google checks the condition when you apply: at least 12 testers opted in continuously for the preceding 14 days. If a dropout leaves fewer than 12 who satisfy it, your eligibility date moves out until a replacement has completed their own period - which is why a buffer of 20-25 testers is the standard recommendation.
The 5 Mistakes That Cost You Your 14 Days
Now the painful part. Below are the five reset triggers that we see on a weekly basis. Each one has cost a developer somewhere a clean two weeks of progress. Memorize them, then run the pre-flight checklist before you tell anyone testing has begun.
Before assuming a reset: a fair share of "my 14-day cycle reset" reports are actually "the cycle never started in the first place" - because the Play Console settings were never quite right. If you suspect that, run through our app not available to testers guide first to confirm the cycle was actually live before you start hunting for reset causes.
Removing and re-adding testers mid-cycle
Even if the headline count stays the same, the person you removed stops providing a continuous opt-in period, and whoever replaces them starts a fresh 14 days of their own. Google does not publish what a mid-cycle list edit does beyond that, so do not assume it is harmless.
Fix: finalize your tester list before day 1. Lock it.
Testers opting out or uninstalling
If a tester clicks "Leave testing program" or switches to a different Google account, they stop providing a continuous opt-in period. Drop below 12 testers who satisfy the full period and you are not eligible to apply until a replacement has completed it themselves. Google does not document how an uninstall on its own affects opt-in status.
Fix: communicate clearly upfront - "do not uninstall for 14 days." And keep a buffer above 12.
Switching or deleting the closed testing track
The requirement is written about a closed test. Moving the release between Internal, Closed and Open tracks - or deleting the closed track and recreating it - can leave you without a qualifying closed test at all, which is worse than a delay.
Fix: create one closed track and leave it alone for 14 days. Internal can run alongside, just do not replace closed.
Replacing tester emails mid-cycle
Adding new testers is generally fine - they simply start their own 14 days. Replacing existing emails (delete + add) removes testers who were already part-way through their period, and the new addresses start from zero.
Fix: add only - never delete - between day 1 and day 14.
Treating "12 added" as "12 qualified"
Google’s published condition is at least 12 testers opted in continuously for at least 14 days when you apply. Twelve names on a list does nothing - an address that never accepts the invitation never starts a period at all. This is the silent killer that sends developers into a second attempt without realising the first one never counted.
Fix: verify the opted-in count inside Play Console daily. If it is below 12, you are not on the clock.
The 14-Day Risk Map: When Each Trigger Strikes
Drop-outs are not evenly distributed across the 14 days. Drop-off risk peaks in two windows: early (days 2-4, when curiosity wears off) and late (days 11-13, when testers think "this is basically done"). Knowing this changes when you remind testers to keep the app installed.
Drop-off risk by day
When to Send Tester Reminders
- Day 2 reminder: "Quick check - is the app still installed? Don't worry, you don't need to use it - just keep it on your device."
- Day 7 reminder: "Halfway there. The 14-day window finishes [exact date]."
- Day 11 reminder: "Almost done - 3 days left. This is the most critical stretch. Please don't uninstall yet."
- Day 14 - hold message: "Cycle complete, but Google still needs to approve production access. Please keep the app installed until I confirm."
- After production approval: "Google approved the app. You can now safely uninstall - thank you."
How to Track Progress in Play Console
Play Console gives you a live view of opted-in tester counts and engagement on your closed track. Check it daily during the 14-day window so you can spot drop-off before it sinks the cycle.
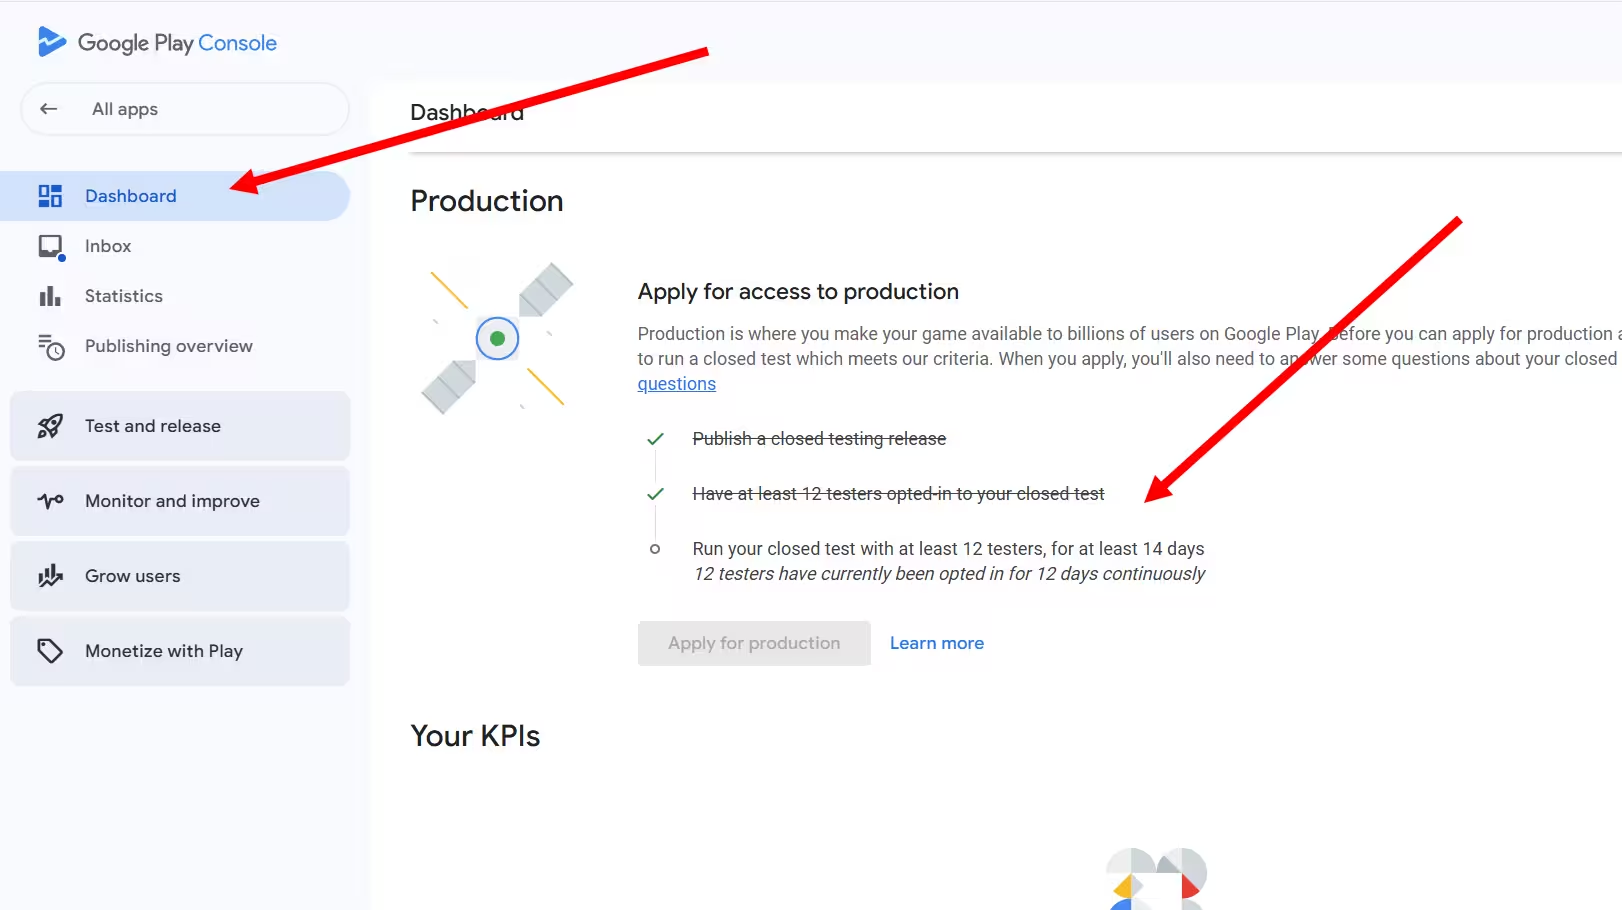
Copy-Ready Tester Invitation Templates
The single biggest predictor of opt-in rate is the quality of the message you send testers. A two-line "please click this and install" message converts at maybe 30%. The templates below convert closer to 70-80% because they explain what testers actually need to do, why it matters to you, and exactly how long they need to keep the app installed.
Initial invitation message
Day 2 reminder (early drop-off prevention)
Day 11 reminder (final stretch)
Critical - Don't Send the "Uninstall Now" Message Yet
Reaching day 14 of closed testing does not mean you have production access. Google still needs to approve your production access request after you complete the questionnaire. If you tell testers to uninstall on day 14 and Google checks your active count during their review (which they often do), your app can be rejected for "not enough active testers" and you start a new 14-day cycle. Keep your testers installed until Google explicitly grants production access - usually 1 to 7 days after you submit the questionnaire. Use the day-14 template below to ask them to hold; use the production-approved template only AFTER Google's green light.
Day 14 - hold message (cycle complete, awaiting Google)
After production approval - safe to uninstall
Tester Readiness Calculator: Score Your Setup in 60 Seconds
Now that you have read the prep work, the methods, and the reset mistakes - check your own setup against them. Answer the five questions below and you will get a real risk score telling you whether your closed testing is genuinely ready, or whether one missed setting is about to cost you 14 days.
Tester Readiness Calculator
5 questions, ~60 seconds. Returns your real reset-risk score.
Low Risk
Score: 0 / 130
Issues to fix before you invite testers
Pre-Flight Checklist Before You Hit Send
Run through this checklist before you fire off invitations. Each item maps to one of the failure modes covered above. If all eight tick, you have done everything in your power to make the cycle survive.
8-point launch checklist
0 of 8 confirmed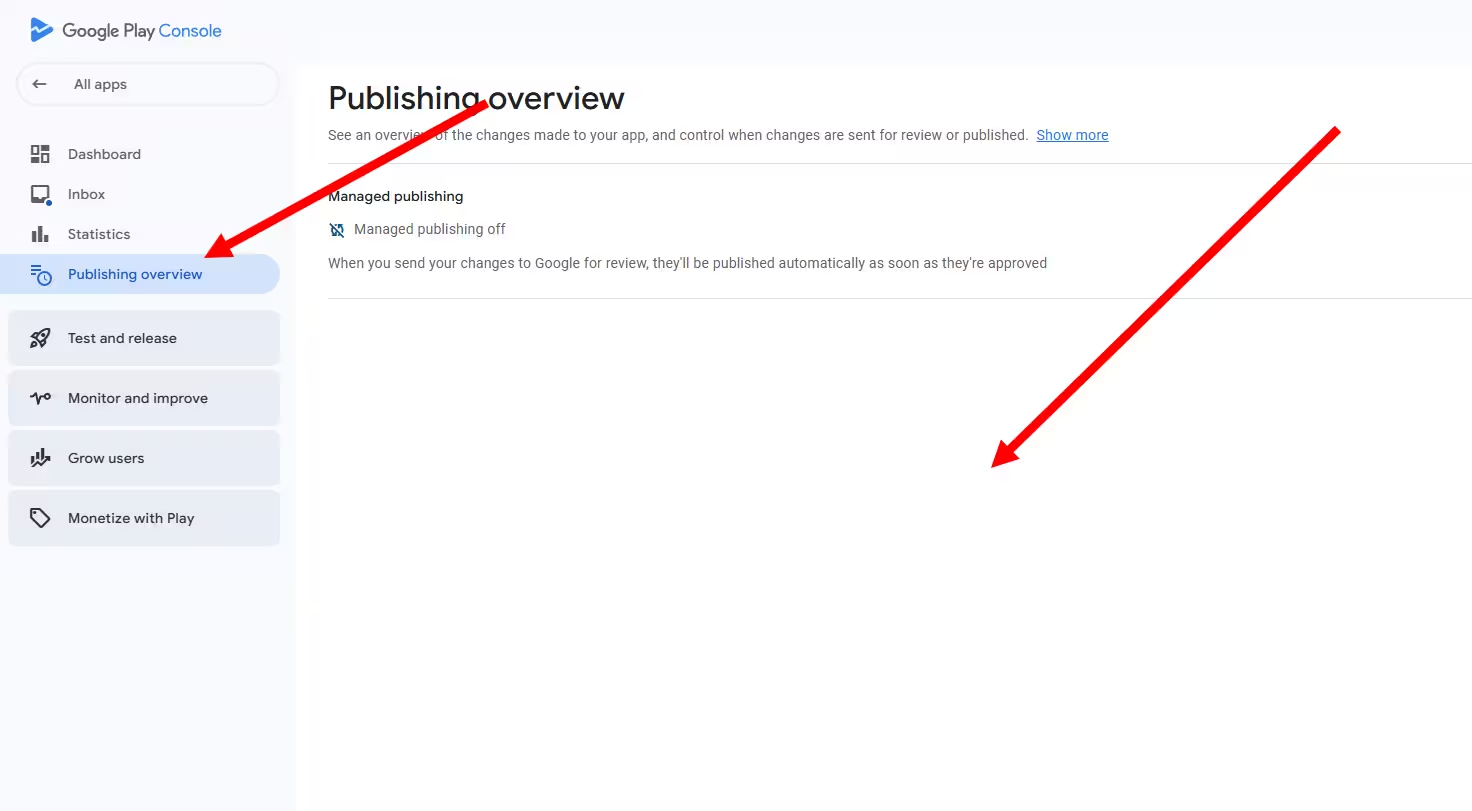
DIY Tester Hunting vs Structured Closed Testing
Most developers try the DIY route first - Reddit threads, Discord groups, tester exchange apps, friends and family, paying random freelancers. It is free or cheap, but the hidden cost is time. Below is how the two approaches compare on the metrics that actually matter for completing your cycle in one go.
| What you care about | DIY (Reddit, friends) | Structured Service |
|---|---|---|
| Time to first 12 opted-in | 1-3 weeks | 4-6 hours |
| Cycle survival on first try | ~30% | ~99% |
| Tester drop-off mid-cycle | Common (curiosity-based) | Managed and monitored daily |
| Account quality | Mixed - dormant accounts, mismatches | Vetted Google accounts |
| Total time to production access | Often 4-6 weeks | 14-15 days |
| Total cost (incl. lost time) | Free up front, expensive in delay | From $19.99, predictable |
How PrimeTestLab Handles Tester Invitation End-to-End
If your real challenge is "I do not know any 12+ Android testers willing to keep an app installed for 14 days," that is exactly what PrimeTestLab solves. You share your closed testing opt-in link. We handle the rest - invitation, opt-in verification, daily engagement monitoring, 14-day retention, and completion tracking. 9,800+ apps and counting.
What You Actually Get After Ordering
Once you place an order, your dashboard walks you through five guided steps that match the structure of this article. We give you everything you need to skip the "find testers" phase entirely:
A ready-to-paste Google Group address
Skip CSV management entirely. Add our official Google Group to your closed testing track and every tester is included automatically:
khadem-testers-service@googlegroups.com
Important: add our Google Group to your closed testing track. Do not paste individual tester emails into your own Google Group - that does not connect to our pool.
OR a downloadable CSV with the full tester pool
If you prefer the email-list method, your dashboard has a one-click download for a CSV containing the entire tester pool (not just 12). Upload it to Closed testing > Testers > Create email list, tick the checkbox, save.
Hourly status monitoring + automatic 1-2 hour start
Once your closed testing track is live and approved by Google, our team checks app availability every hour. The moment your app is downloadable, our testers start opting in - typically within 1 to 2 hours of Google's approval. You do not have to ping us, refresh anything, or chase status.
Day-by-day retention + drop-off prevention
Our testers do not just opt in and disappear. We monitor active counts daily so you stay above the 12-tester threshold for the full 14 days, even if natural drop-off occurs. This is why our success rate is 99.9% on first attempt vs ~30% for typical DIY tester hunting.
Current Packages
Starter
12 Testers
$19.99
Enterprise
25 Testers
$27.99
Professional
20 Testers
$29.99
+5% service fee
Frequently Asked Questions
Do I need 12 testers for Google Play closed testing?
Yes. For new personal developer accounts, Google requires at least 12 testers completing a 14-day continuous closed testing cycle before production access is granted. The 12 must be opted-in, installed, and remain active for the full 14 days - not just added to your email list.
Can I invite testers without Gmail accounts?
No. Closed testing requires Google accounts. Any email used for testing must be a Google account (Gmail or a Google Workspace account). Non-Google emails will not be able to opt in or install your app from the closed testing track.
What is the difference between Invited and Opted-in testers?
Invited means the email was added to your tester list inside Play Console. Opted-in means the tester actually clicked the opt-in link, signed in, and clicked Become a tester. Only opted-in testers count toward Google's 12-tester requirement. An invited but not opted-in tester contributes nothing.
What costs you the 14-day closed testing period?
Google publishes a condition checked when you apply - at least 12 testers opted in continuously for the preceding 14 days - not a single global countdown that zeroes. Five things commonly cost developers that condition: removing testers mid-cycle, testers opting out, replacing emails on the tester list, switching or deleting the closed testing track, and simply not having 12 testers who satisfy the full period. Each one pushes the date you become eligible; none of them is documented as erasing the periods your other testers already completed.
Should I use an email list or a Google Group for closed testing?
Use an email list for small, fixed groups (under 20 testers). Use a Google Group when you need to manage testers in one place without re-uploading the list to Play Console - you simply add or remove people inside the group. Google Groups is recommended for ongoing testing programs.
Can I run internal testing alongside closed testing?
Yes - internal and closed testing can run in parallel without affecting each other. But internal testing time does NOT count toward the 14-day closed testing requirement for production access on personal accounts. Only closed testing time counts.
Do I need a demo account for closed testing?
Yes, if your app has a sign-in screen or any gated functionality. Add demo credentials in Play Console under Policy > App content > App access. Provide a working username and password plus instructions on what features the demo account unlocks. Without this, both Google's reviewer and your testers can be blocked from your app, which quietly kills the cycle.
How do I let testers test in-app purchases without being charged?
Add their Gmail addresses to Play Console under Setup > License testing. Accounts on this list receive sandbox responses for all Google Play Billing calls instead of being charged real money. The setting takes effect immediately - no Google review required. Forgetting this means testers will refuse to test paid features (and rightly so).
Can I skip closed testing on a personal account?
No. Personal developer accounts (created after Google's 2023 policy change) must complete the 14-day closed testing cycle with at least 12 active testers before requesting production access. Organizational accounts have different rules and can sometimes skip the requirement.
How fast can PrimeTestLab provide testers?
Once your closed testing track is live and reachable, PrimeTestLab testers typically begin opting in within 4-6 hours. Pricing starts at $19.99 for 12 testers.
Bottom Line
Summary
Closed testing is not technically difficult, but it is operationally sensitive. Inviting testers means: (1) create a closed track with an active release, (2) add testers via Email list or Google Groups, (3) share the opt-in link and verify each tester opts in, and (4) protect the 14-day period from the 5 common mistakes - especially mid-cycle list changes and falling below 12 qualifying testers. Google checks the condition when you apply, so the difference between invited, opted-in, installed, and opted in for the full 14 days is what decides whether you are eligible or waiting. If you would rather not chase testers manually, PrimeTestLab provides 12 to 25 vetted testers starting at $19.99 with testing typically beginning in 4-6 hours. See pricing plans →